

In a previous tutorial, we covered how to set up a gateway using iptables, a user-space application, as detailed at http://xmodulo.com/2014/06/internet-connection-sharing-iptables-linux.html. This tutorial will focus on turning that gateway into a transparent proxy server. A proxy is called “transparent” when clients are unaware their requests are being processed through it.
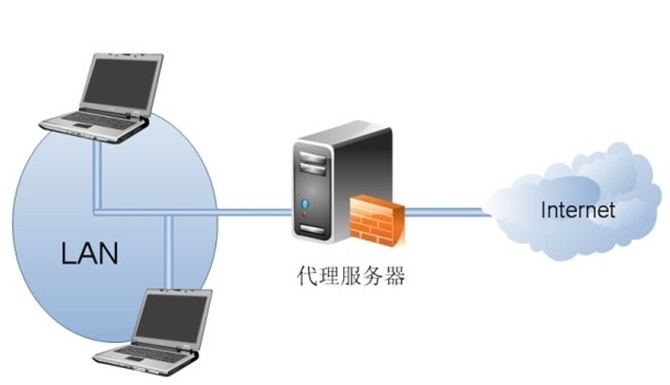
Using a transparent proxy offers several benefits. For end-users, it can improve the web browsing experience by caching frequently visited website content while imposing minimal configuration overhead. For administrators, it can be used to enforce various administrative policies, such as content/URL/IP filtering and rate limiting.
A proxy server acts as an intermediary between clients and destination servers. Clients send requests to the proxy server, which then evaluates the request and takes the necessary action. In this tutorial, we will use Squid to set up a web proxy server. Squid is a robust, customizable, and stable proxy server. Personally, I have managed a Squid server handling over 400 client workstations for about a year. Although on average I needed to restart the service about once a month, the processor and storage utilization, throughput, and client response times were all satisfactory.
We will configure Squid for the following topology. The CentOS/RHEL device has one network card (eth0) connected to the private LAN and another (eth1) connected to the Internet.
Installing Squid
To build a transparent proxy system using Squid, we first need to add the necessary iptables rules. These rules should help you get started, but be sure to ensure they don’t conflict with any existing configuration.
# iptables -t nat -A POSTROUTING -o eth1 -j MASQUERADE
# iptables -t nat -A PREROUTING -i eth0 -p tcp –dport 80 -j REDIRECT –to-port 3128
The first rule causes all outbound packets from eth1 (the WAN interface) to have the source IP address of eth1 (i.e., enabling NAT). The second rule redirects all inbound HTTP packets (destined for TCP 80) from eth0 (the LAN interface) to Squid’s listening port (TCP 3128) instead of forwarding them directly to the WAN interface.
We will use yum to install Squid.
# yum install squid
Now, we will modify the Squid configuration to turn it into a transparent proxy. We define our LAN subnet (e.g., 10.10.10.0/24) as the valid client network. Any traffic not originating from this LAN subnet will be denied access.
# vim /etc/squid/squid.conf
visible_hostname proxy.example.tst
http_port 3128 transparent
## Define our network ## acl our_network src 10.10.10.0/24
## Ensure our network is allowed access ## http_access allow our_network
## Finally, deny all other traffic ## http_access deny all
Now we start the Squid service and ensure it is added to the startup list.
# service squid start
# chkconfig squid on
Now that Squid is set up and running, we can test its functionality by monitoring the Squid log. Access any URL from a computer connected to the LAN, and you should see content similar to the following in the log.
# tailf /var/log/squid/access.log
1402987348.816 1048 10.10.10.10 TCP_MISS/302 752
GET http://www.google.com/ – DIRECT/173.194.39.178
text/html
1402987349.416 445 10.10.10.10 TCP_MISS/302 762
GET http://www.google.com.bd/? – DIRECT/173.194.78.
94 text/html
According to the log file, a machine with IP address 10.10.10.10 attempted to access google.com, and Squid handled the request.
A basic Squid proxy server is now ready. In the remainder of this tutorial, we will adjust some parameters of Squid to control outbound traffic. Please note: this is for demonstration only. Actual policies should be customized to meet your specific requirements.
Preparation
Before we begin configuration, let’s clarify a few key points.
Squid Configuration Parsing
When reading the configuration file, Squid parses it in a top-down manner. Rules are parsed from top to bottom until a match is found. Once a match is found, that rule is executed; any subsequent rules below it are ignored. Therefore, the best practice for adding filtering rules is to specify them in the following order.
explicit allow
explicit deny
allow entire LAN
deny all
Squid Restart vs. Squid Reconfigure
Once the Squid configuration is modified, the Squid service needs to be restarted. Restarting the service can take some time, sometimes minutes, depending on the number of active connections. During this period, LAN users cannot access the Internet. To avoid this service interruption, we can use the following command instead of “service squid restart”.
# squid -k reconfigure
This command allows Squid to run with updated parameters without needing a full restart.
Filtering LAN Hosts by IP Address
In this demonstration, we want to set up Squid to deny Internet access to the host with IP address 10.10.10.24 and the host with IP address 10.10.10.25. To do this, we create a text file “denied-ip-file” containing the IP addresses of all denied hosts, and then add a reference to this file in the Squid configuration.
# vim /etc/squid/denied-ip-file
10.10.10.24
10.10.10.25
# vim /etc/squid/squid.conf
## First we create an Access Control List (ACL) to isolate the denied IP addresses ## acl denied-ip-list src "/etc/squid/denied-ip-file"
## Then, we apply the ACL ## http_access deny denied-ip-list ## Explicitly deny ## http_access allow our_network
## Allow LAN ## http_access deny all ## Deny all ##
Now we need to restart the Squid service. Squid will no longer honor requests from these IP addresses. If we check the squid log, we will see requests from these hosts in a “TCP_DENIED” state.
Filtering Blacklisted Websites
This method works only for HTTP. Suppose we want to block badsite.com and denysite.com. We can add these two domains to a file and add a reference to squid.conf.
# vim /etc/squid/badsite-file
badsite
denysite
# vim /etc/squid/squid.conf
## ACL Definition ## acl badsite-list url_regex "/etc/squid/badsite-file"
## ACL Application ## http_access deny badsite-list
http_access deny denied-ip-list ## Previously set, but has no effect here ## http_access allow our_network
http_access deny all
Please note: we used the ACL type “url_regex”, which will match the words “badsite” and “denysite” in the requested URL. That means any request whose URL contains “badsite” or “denysite” (e.g., badsite.org, newdenysite.com, or otherbadsite.net) will be blocked.
Combining Multiple ACLs
We will create an access list to block the client with IP 10.10.10.200 and the client with IP 10.10.10.201 from accessing custom-block-site.com. All other clients will be able to access this site. To achieve this, we will first create an access list to isolate these two IP addresses, then create another access list to isolate the desired website. Finally, we will use both access lists together to meet the requirement.
# vim /etc/squid/custom-denied-list-file
10.10.10.200
10.10.10.201
# vim /etc/squid/custom-block-website-file
custom-block-site
# vim /etc/squid/squid.conf
acl custom-denied-list src "/etc/squid/custom-denied-list-file"
acl custom-block-site url_regex "/etc/squid/custom-block-website-file"
## ACL Application ## http_access deny custom-denied-list custom-block-site
http_access deny badsite-list ## Previously set, but has no effect here ## http_access deny denied-ip-list ## Previously set, but has no effect here ## http_access allow our_network
http_access deny all
# squid -k reconfigure
The blocked hosts should now be unable to access the specified website. The log file /var/log/squid/access.log should contain “TCP_DENIED” for the corresponding requests.
Setting Maximum Download File Size
Squid can be used to control the maximum downloadable file size. We want to limit the maximum download size to 50 MB for the host with IP 10.10.10.200 and the host with IP 10.10.10.201. We previously created the ACL “custom-denied-list” to isolate traffic from these source addresses. Now, we will use the same access list to restrict download file size.
# vim /etc/squid/squid.conf
reply_body_max_size 50 MB custom-denied-list
# squid -k reconfigure
Establishing a Squid Cache Hierarchy
Squid supports caching by storing frequently accessed files in the local storage system. Imagine 100 users on your LAN accessing google.com. Without caching, the Google logo or doodle would need to be fetched individually for every single request. Squid can store the logo or doodle in its cache and serve it from there. This not only improves perceived performance for users but also reduces bandwidth usage. It’s a win-win situation.
To enable caching, we can modify the squid.conf configuration file.
# vim /etc/squid/squid.conf
cache_dir ufs /var/spool/squid 100 16 256
The numbers 100, 16, and 256 have the following meanings.
• Allocate 100 MB of storage space for the Squid cache. You can increase the allocated space if you wish.
• 16 directories (each containing 256 subdirectories) will be used to store cache files. This parameter should not be changed.
We can verify whether Squid caching is enabled by checking the log file /var/log/squid/access.log. If a cache hit is successful, we should see entries marked with “TCP_HIT”.
In summary, Squid is a powerful, industry-standard web proxy server widely used by system administrators worldwide. Squid provides simple access control features for managing traffic from a LAN. It can be deployed in both large enterprise networks and small business networks. This tutorial covered only a small fraction of Squid’s full capabilities. For a complete overview of its features, please refer to the official documentation (http://wiki.squid-cache.org/Features).
I hope this article is helpful to you.
Original English article: http://xmodulo.com/2014/06/squid-transparent-web-proxy-centos-rhel.html