1. What Is FastCGI
FastCGI is a scalable, high-speed interface for communication between HTTP servers and dynamic scripting languages. Most popular HTTP servers support FastCGI, including Apache, Nginx, and lighttpd. Likewise, FastCGI is supported by many scripting languages, among them PHP.
FastCGI evolved from and improved upon CGI. The main drawback of the traditional CGI interface is poor performance, because every time the HTTP server encounters a dynamic program, it needs to restart the script parser to execute it, and then the result is returned to the HTTP server. This is nearly unusable when handling high-concurrency traffic. Additionally, the traditional CGI method has poor security and is now rarely used.
The FastCGI interface adopts a C/S (Client/Server) architecture, which allows the HTTP server and the script parsing server to be separated. One or more script parsing daemon processes are started on the script parsing server. Whenever the HTTP server encounters a dynamic program, it can hand it off directly to a FastCGI process for execution and then return the obtained result to the browser. This approach lets the HTTP server focus solely on handling static requests or returning results from the dynamic script server to the client, which greatly improves the performance of the entire application system.
2. How Nginx+FastCGI Works
Nginx does not support directly calling or parsing external programs; all external programs (including PHP) must be called via the FastCGI interface. The FastCGI interface under Linux is a socket (this socket can be a file socket or an IP socket). To call a CGI program, a FastCGI wrapper is also needed (a wrapper can be understood as a program used to start another program). This wrapper binds to a fixed socket, such as a port or a file socket. When Nginx sends a CGI request to this socket, the wrapper receives the request through the FastCGI interface, then spawns a new thread. This thread calls the interpreter or external program to process the script and reads the returned data; subsequently, the wrapper passes the returned data back through the FastCGI interface along the fixed socket to Nginx; finally, Nginx sends the returned data to the client. This is the entire operation process of Nginx+FastCGI. The detailed process is shown in Figure 1.
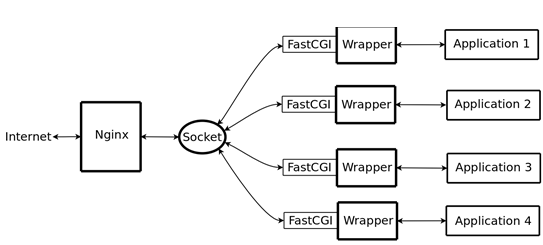
Figure 1: Nginx+FastCGI Operating Principle
3. spawn-fcgi vs PHP-FPM
As introduced earlier, the FastCGI interface method starts one or more daemon processes on the script parsing server to parse dynamic scripts. These processes are the FastCGI process manager, or FastCGI engine. spawn-fcgi and PHP-FPM are two FastCGI process managers that support PHP.
Below is a brief introduction to the similarities and differences between spawn-fcgi and PHP-FPM.
spawn-fcgi is a part of the HTTP server lighttpd. It has since become an independent project and is generally used with lighttpd to support PHP. However, under high concurrency, lighttpd’s spawn-fcgi can suffer from memory leaks and even automatically restart the FastCGI process.
Nginx is a lightweight HTTP server that must rely on a third-party FastCGI processor to parse PHP. Therefore, a combination of Nginx+spawn-fcgi can also parse PHP, though we won’t elaborate on that here.
PHP-FPM is another third-party FastCGI process manager. It was developed as a patch for PHP and needs to be compiled together with the PHP source code during installation. This means PHP-FPM is compiled into the PHP core, making it superior in processing performance. At the same time, it handles high concurrency much better than the spawn-fcgi engine. Therefore, the Nginx+PHP/PHP-FPM combination is recommended for parsing PHP.
The main advantage of FastCGI is the separation of dynamic languages from the HTTP Server. Thus, Nginx and PHP/PHP-FPM are often deployed on different servers to offload pressure from the front-end Nginx server, allowing Nginx to focus on handling static requests and forwarding dynamic requests, while the PHP/PHP-FPM server focuses on parsing PHP dynamic requests.
4. PHP and PHP-FPM Installation and Optimization
1. Download Installation Packages
Download the PHP source package from the official website at www.php.net. Here we download the stable version php-5.2.13.tar.gz.
Download the corresponding PHP-FPM source package from http://php-fpm.org/downloads/. Here we download php-5.2.13-fpm-0.5.13.diff.gz.
Note that when choosing software package versions, try to keep the PHP and PHP-FPM versions consistent. Large version gaps may lead to compatibility issues.
2. Configure the Installation Environment
Installing PHP requires the support of the following software packages. If they are not installed, please install them yourself.
- gcc gcc-c++ libxml2 libxml2-devel autoconf libjpeg libjpeg-devel libpng libpng-devel freetype freetype-devel zlib zlib-devel glibc glibc-devel glib2 glib2-devel
Due to variability across Linux distributions, readers can also install the corresponding software libraries during the PHP installation process based on any error messages that appear.
3. Start Compiling and Installing PHP and PHP-FPM
Compiling and installing PHP and PHP-FPM is straightforward. Here is the installation process:
- [root@localhost local]#tar zxvf php-5.2.13.tar.gz
- [root@localhost local]#gzip -cd php-5.2.13-fpm-0.5.13.diff.gz | patch -d php-5.2.13 -p1
- [root@localhost local]#cd php-5.2.13
- [root@localhost php-5.2.13]#./configure –prefix=/usr/local/php –enable-fastcgi –enable-fpm
- [root@localhost php-5.2.13]#make
- [root@localhost php-5.2.13]#make install
- [root@localhost php-5.2.13]cp php.ini-dist /usr/local/php/lib/php.ini
In the second step, PHP-FPM is applied as a patch to the PHP source code.
In the “./configure” compilation options, it specifies installing PHP to /usr/local, “–enable-fastcgi” enables FastCGI support for PHP, and “–enable-fpm” activates fpm support for the FastCGI mode.
During the compiYou can include many compile options when building PHP, but to focus on PHP’s FastCGI functionality here, no extra compile options were added.
4. Configure and Optimize PHP-FPM
The global configuration file for PHP is php.ini. In the steps above, this file has already been copied to /usr/local/php/lib/php.ini. You can configure php.ini according to the requirements of each application.
Below, we focus on the configuration file for the PHP-FPM engine.
Based on the installation path specified above, the default configuration file for PHP-FPM is /usr/local/php/etc/php-fpm.conf.
php-fpm.conf is a plain text file in XML format, and its contents are easy to understand. Here we highlight a few important configuration tags:
The tag listen_address configures the IP address and port on which the FastCGI process listens, defaulting to 127.0.0.1:9000.
127.0.0.1:9000
The tag display_errors sets whether to display PHP error messages. The default is 0, which hides errors; setting it to 1 will display PHP error messages.
0
The user and group tags are used to set the user and group under which the FastCGI process runs. It is important that the user and group specified here match those specified in the Nginx configuration file.
nobody
nobody
The tag max_children sets the number of FastCGI processes. According to official recommendations, servers with less than 2GB of memory can enable just 64 processes, while servers with over 4GB of memory can enable 200 processes.
5
The tag request_terminate_timeout sets the time limit for FastCGI to execute a script. The default is 0s, meaning unlimited execution time, and it can be modified as needed.
0s
The tag rlimit_files sets the limit on open file descriptors for PHP-FPM, with a default value of 1024. This tag’s value must be linked to the Linux kernel’s open file limit; for example, to set this value to 65535, you must execute ‘ulimit -HSn 65536’ on the Linux command line.
1024
The tag max_requests specifies the maximum number of requests each child process handles before being shut down. The default setting is 500.
500
The tag allowed_clients sets the IP addresses permitted to access the FastCGI process parser. If an IP address is not specified here, PHP parsing requests forwarded by Nginx will not be accepted.
127.0.0.1
5. Manage FastCGI Processes
After configuring php-fpm, you can start the FastCGI process. There are two ways to start the FastCGI process:
- /usr/local/php/bin/php-cgi –fpm
- or
- /usr/local/php/sbin/php-fpm start
The second method is recommended for starting the FastCGI process.
/usr/local/php/sbin/php-fpm also supports other parameters, specifically: start|stop|quit|restart|reload|logrotate.
The meaning of each startup parameter is as follows:
- start, starts the PHP FastCGI process.
- stop, forcefully terminates the PHP FastCGI process.
- quit, gracefully terminates the PHP FastCGI process.
- restart, restarts the PHP FastCGI process.
- reload, reloads the PHP php.ini configuration.
- logrotate, re-enables the log file.
reload is a very important parameter. It allows you to reload a modified php.ini without interrupting the PHP FastCGI process, thus enabling smooth changes to PHP settings in FastCGI mode via php-fpm.
Once the FastCGI process starts, its listening IP address and port are also initiated. You can check the relevant information using ps and netstat.
- [root@localhost php]# netstat -antl|grep 9000
- tcp 0 0 127.0.0.1:9000 0.0.0.0:* LISTEN
- [root@localhost php]# ps -ef|grep php-cgi
- root 3567 1 0 17:06 ? 00:00:00 /usr/local/php/bin/php-cgi –fpm –fpm-config /usr/local/php/etc/php-fpm.conf
- nobody 3568 3567 0 17:06 ? 00:00:00 /usr/local/php/bin/php-cgi –fpm –fpm-config /usr/local/php/etc/php-fpm.conf
- nobody 3569 3567 0 17:06 ? 00:00:00 /usr/local/php/bin/php-cgi –fpm –fpm-config /usr/local/php/etc/php-fpm.conf
- nobody 3570 3567 0 17:06 ? 00:00:00 /usr/local/php/bin/php-cgi –fpm –fpm-config /usr/local/php/etc/php-fpm.conf
- nobody 3571 3567 0 17:06 ? 00:00:00 /usr/local/php/bin/php-cgi –fpm –fpm-config /usr/local/php/etc/php-fpm.conf
- nobody 3572 3567 0 17:06 ? 00:00:00 /usr/local/php/bin/php-cgi –fpm –fpm-config /usr/local/php/etc/php-fpm.conf
- root 3583 3524 0 17:09 pts/1 00:00:00 grep php-cgi
5. Configure Nginx to Support PHP
The installation of Nginx is particularly straightforward and has already been covered in detail earlier, so we will not repeat it here. The focus below is on how Nginx processes and parses PHP through the FastCGI process of php-fpm.
Since Nginx itself does not parse PHP, enabling Nginx to support PHP essentially involves forwarding requests for PHP pages to the IP address and port that the FastCGI process listens on. If you treat php-fpm as a dynamic application server, then Nginx acts as a reverse proxy server. Nginx achieves PHP parsing through its reverse proxy functionality — this is the underlying principle of how Nginx implements dynamic PHP parsing.
Here, we assume that the installation directory for Nginx is /usr/local, so the path to the Nginx configuration file is /usr/local/nginx/conf/nginx.conf. Below is a virtual host configuration example for enabling PHP support under Nginx.
- server {
- include port.conf;
- server_name www.ixdba.net ixdba.net;
-
- location / {
- index index.html index.php;
- root /web/www/www.ixdba.net;
- }
-
- location ~ /.php$ {
- root html;
- fastcgi_pass 127.0.0.1:9000;
- fastcgi_index index.php;
- fastcgi_param SCRIPT_FILENAME html$fastcgi_script_name;
- include fastcgi_params;
- }
- }
-
Using the location directive, all files with the .php suffix are handed off to 127.0.0.1:9000 for processing. The IP address and port here are exactly what the FastCGI process is listening on.
The fastcgi_param directive specifies the root directory where PHP dynamic programs reside, which is the path set before $fastcgi_script_name — here it’s /usr/local/nginx/html. It is recommended to keep this directory consistent with the root directory defined in the Nginx virtual host, though they can differ.
The fastcgi_params file is a parameter configuration file for the FastCGI process. A default one is generated after Nginx is installed, and it’s included here using the include directive.
Next, start the Nginx service.
/usr/local/nginx/sbin/nginx
At this point, Nginx+PHP has been fully configured.
VI. Testing Nginx’s PHP Parsing Capability
Create a phpinfo.php file in the /usr/local/nginx/html directory with the following content:
Then access http://www.ixdba.net/index.html in your browser; by default it should display “Welcome to Nginx!”, indicating Nginx is running properly.
Next, visit http://www.ixdba.net/phpinfo.php in your browser. If PHP parses correctly, you’ll see the PHP installation configuration and a list of feature statistics.
VII. Practical Example: Optimizing FastCGI Parameters in Nginx
After configuring Nginx+FastCGI, to ensure a high-speed and stable PHP environment under Nginx, you need to add some FastCGI optimization directives. Below is an optimization example; add the following code to the HTTP level in the Nginx main configuration file.
- fastcgi_cache_path /usr/local/nginx/fastcgi_cache levels=1:2 keys_zone=TEST:10m inactive=5m;
- fastcgi_connect_timeout 300;
- fastcgi_send_timeout 300;
- fastcgi_read_timeout 300;
- fastcgi_buffer_size 64k;
- fastcgi_buffers 4 64k;
- fastcgi_busy_buffers_size 128k;
- fastcgi_temp_file_write_size 128k;
- fastcgi_cache TEST;
- fastcgi_cache_valid 200 302 1h;
- fastcgi_cache_valid 301 1d;
- fastcgi_cache_valid any 1m;
Below is an introduction to the meaning of the above code.
The first line of code specifies a file path, directory structure level, key zone storage time, and inactive deletion time for the FastCGI cache.
fastcgi_connect_timeout specifies the timeout period for connecting to the backend FastCGI.
fastcgi_send_timeout specifies the timeout period for sending a request to FastCGI. This value is the timeout for sending the request after the two-way handshake has been completed.
fastcgi_read_timeout specifies the timeout period for receiving a FastCGI response. This value is the timeout for receiving the response after the two-way handshake has been completed.
fastcgi_buffer_size is used to specify the size of the buffer needed to read the first part of the FastCGI response. This value indicates that one 64KB buffer will be used to read the first part of the response (the response header), and it can be set to the buffer size specified by the fastcgi_buffers option.
fastcgi_buffers specifies how many and how large the local buffers need to be to buffer FastCGI response requests. If a page generated by a PHP script is 256KB in size, then 4 buffers of 64KB will be allocated to cache it; if the page size is larger than 256KB, the portion exceeding 256KB will be cached in the path specified by fastcgi_temp. However, this is not a good approach, as data processing speed in memory is faster than on disk. Generally, this value should be the median page size generated by the PHP scripts on your site. If most scripts on the site generate pages of 256KB, then this value can be set to “16 16k”, “4 64k”, etc.
The default value of fastcgi_busy_buffers_size is twice that of fastcgi_buffers.
fastcgi_temp_file_write_size specifies the data block size used when writing to the cache file, and its default value is twice that of fastcgi_buffers.
fastcgi_cache enables FastCGI caching and assigns a name to it. Enabling caching is very useful, as it can effectively reduce CPU load and prevent 502 errors. However, enabling caching can also cause many issues, so it should be evaluated on a case-by-case basis.
fastcgi_cache_valid is used to specify the cache duration for response codes. The values in the example indicate that 200 and 302 responses are cached for one hour, 301 responses are cached for one day, and all other responses are cached for one minute.
This article is from “Technology Realizes Dreams” blog, please be sure to keep this sourcehttp://ixdba.blog.51cto.com/2895551/806622