

System Environment: A newly set up PC server machine serving as an application server, with Windows 2003 as the operating system.
Services deployed on the system: using Tomcat, with the service port set to 8080.
Problem: The application could be accessed on the server via http://localhost:8080/sysname/, but entering http://IP:8080;sysname/ from an external machine failed to access
the application, although pinging the IP was successful.
Problem Analysis: Port 8080 was not open.
Problem Verification: Entering telnet IP 8080 showed a connection failure, confirming that port 8080 was not open.
Problem Resolution:
(I)Configuring the Windows 2003 System Firewall
The firewall provided by Windows 2003 is called Internet Connection Firewall. It protects the network from external threats by allowing secure network communication through the firewall while denying insecure communication. The Internet Connection Firewall is only included in Windows Server 2003 Standard Edition and the 32-bit version of Windows Server 2003 Enterprise Edition.
On a Windows 2003 server, you can enable the firewall for computers directly connected to the Internet, supporting network adapters, DSL adapters, or dial-up modems connecting to the Internet.
The Windows 2003 Internet Connection Firewall can manage service ports, such as port 80 for HTTP, port 21 for FTP, etc. As long as the system provides these services, the Internet Connection Firewall can monitor and manage these ports.
Configuring the System Firewall
1. Right-click the“Local Area Connection”icon at the bottom right corner of the desktop, and click the“Status”option.
2. In the“Local Area Connection Status”dialog box that appears, click the“Properties”button.
3. In the pop-up“Local Area Connection Properties”dialog box, click the“Advanced”tab.
4. The interface for starting/stopping the firewall appears as shown below. To enable the Internet Connection Firewall, check the“Protect my computer and network by limiting or preventing access to this computer from the Internet”checkbox, then click the“Settings”button.
5. In the pop-up“Advanced Settings”dialog box, under the Services tab, configure the firewall’sWebservice by checking the “WebServer (HTTP)”option.
6. Click the“OK”button. Once configured, network users will be unable to access other network services provided by this server except theWebservice.
Note: You can select based on the services provided by the Windows 2003 server; multiple selections are allowed. Common standard services are pre-configured in the system; you just need to check the corresponding options. If the server also provides non-standard services, the administrator needs to add them manually.
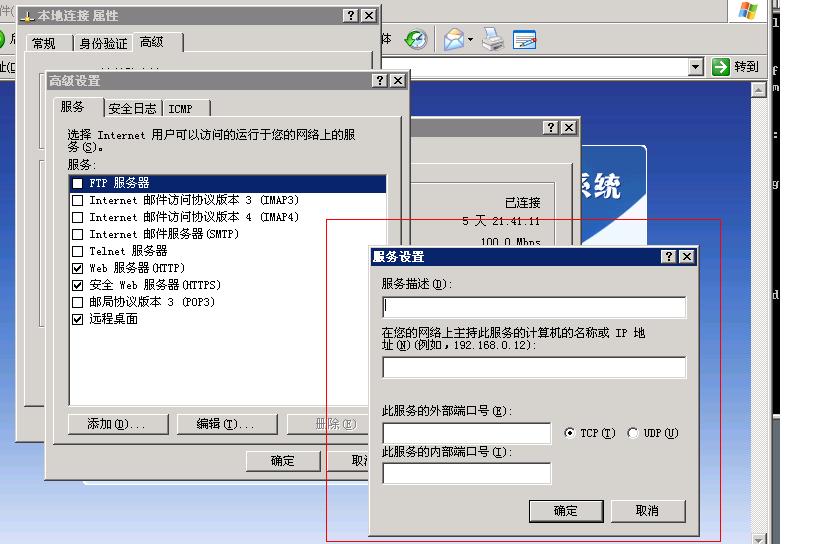
7. To add a service setting, click the“Add”button.
8. In the“Service Add”dialog box that appears, you can enter the service description,IPaddress, the port number used by the service, and select the protocol used (Webservices use theTCPprotocol,DNSqueries use theUDPprotocol) to configure non-standard services.
9. To configure firewall security log settings, in the“Advanced Settings”dialog box, select the“Security Log”tab. The“Security Log Settings”dialog box appears, allowing you to choose items to record; the firewall will log the corresponding data. The default log file path isC:WindowsPfirewall.log, which can be opened with Notepad. The generated security log uses theW3CExtended Log File Format and can be viewed and analyzed with common log analysis tools.
Note: Establishing a security log is highly necessary, as it can provide reliable evidence when server security is threatened.
10.Internet Connection Firewall Summary
The Internet Connection Firewall can effectively block illegal intrusions into the Windows 2003 server and prevent illegal remote hosts from scanning the server, thereby improving the security of the Windows 2003 server. Simultaneously, it can also effectively intercept viruses, such as the Blaster worm, that exploit operating system vulnerabilities for port attacks. If this firewall feature is enabled on a virtual router built with Windows 2003, it can provide excellent protection for the entire internal network.
Key Point:
The most important step is Step Seven: Adding a service setting.
Open the “Advanced” tab in the Local Area Connection, click the “Settings” button, and the “Advanced Settings” dialog box will pop up, as shown below——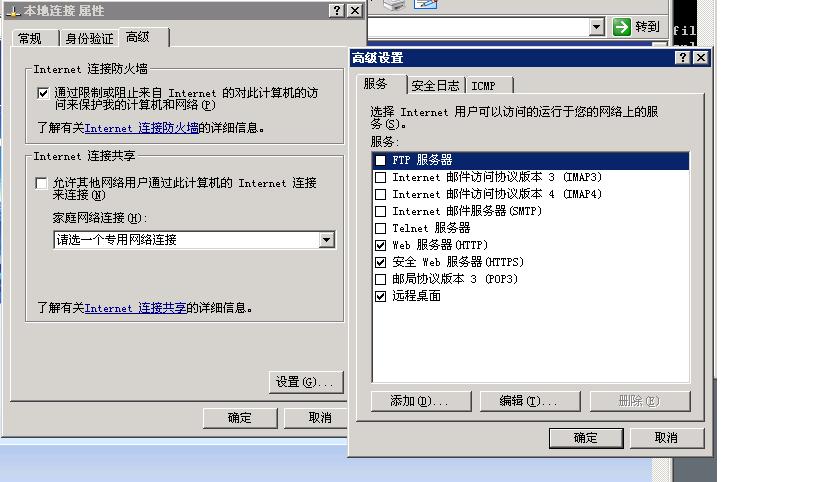
Click the “Add” button, and the following dialog box will pop up. Enter the following information:
Service Description: tomcat server
IP Address: the actual address
External Port number: 8080
Internal Port number: leave blank
Save and confirm.
After completing the above two steps, entering telnet IP 8080 from another networked machine will result in a blank screen, indicating a successful connection to port 8080.
Accessing the service again confirmed that everything was working perfectly.
Thanks to my partner for their great support; the problem is finally resolved.