

I. Introduction
MySQL Cluster is a high-availability, high-redundancy version of MySQL designed for distributed computing environments. It uses the NDB Cluster storage engine, allowing multiple MySQL servers to run within a single Cluster. The storage engine is available in MySQL 5.0 and later binary versions, as well as in RPM packages compatible with the latest Linux distributions. MySQL Cluster is a technology that enables deploying an “in-memory” database Cluster in shared-nothing systems. With a shared-nothing architecture, the system can use inexpensive hardware without special hardware or software requirements. Furthermore, since each component has its own memory and disk, there is no single point of failure. MySQL Cluster consists of a group of computers, each running multiple processes including MySQL servers, NDB Cluster data nodes, management servers, and (optionally) dedicated data access programs.
II. MySQL Cluster Basic Concepts
NDB is an “in-memory” storage engine known for high availability and strong data consistency. MySQL Cluster can configure the NDB storage engine with various failover and load-balancing options, though doing so at the Cluster-level storage engine is the simplest approach. The NDB storage engine of MySQL Cluster contains the complete dataset, depending only on other data within the Cluster itself.
Currently, the Cluster component of MySQL Cluster can be configured independently of the MySQL server. In MySQL Cluster, each component is treated as a node.
Management (MGM) Node: This type of node manages other nodes within MySQL Cluster, providing configuration data, starting and stopping nodes, running backups, etc. Since this node manages the configuration of other nodes, it should be started first before any other nodes. The MGM node is started with the command “ndb_mgmd”.
Data (NDB) Node: This type of node stores the Cluster’s data. The number of data nodes is related to the number of replicas and is a multiple of the number of fragments. For example, with two replicas and two fragments per replica, there will be 4 data nodes. However, it is not necessary to set up multiple replicas. Data nodes are started with the command “ndbd”.
Client (SQL) Node: This is the node used to access Cluster data. For MySQL Cluster, the client node is a traditional MySQL server using the NDB Cluster storage engine. Typically, SQL nodes are started with the command “mysqld -ndbcluster”, or by adding “ndbcluster” to “my.cnf” and then starting with “mysqld”.
Note: In many contexts, the term “node” refers to a computer, but when discussing MySQL Cluster, it refers to a process. There can be any number of nodes on a single computer, for which we use the term “Cluster host”.
The management server (MGM node) is responsible for managing the Cluster configuration file and Cluster logs. Each node in the Cluster retrieves configuration data from the management server and requests the method for determining the management server’s location. When new events occur within a data node, the node transmits information about such events to the management server, which then writes this information to the Cluster log.
III. Environment
System: CentOS 6.4 32-bit 9 machines
Software packages (downloadable from MySQL official site: http://dev.mysql.com/downloads/cluster/):
MGM:
MySQL-Cluster-gpl-management-7.1.31-1.el6.i686.rpm
MySQL-Cluster-gpl-tools-7.1.31-1.el6.i686.rpm
SQL Node:
MySQL-Cluster-gpl-client-7.1.31-1.el6.i686.rpm
MySQL-Cluster-gpl-server-7.1.31-1.el6.i686.rpm
NDB Node:
MySQL-Cluster-gpl-storage-7.1.31-1.el6.i686.rpm
Topology Diagram:
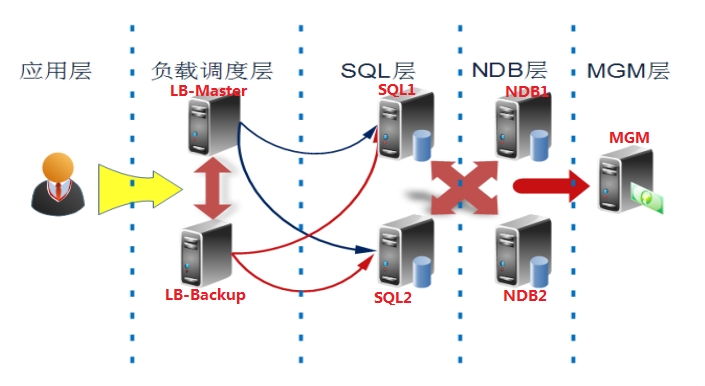
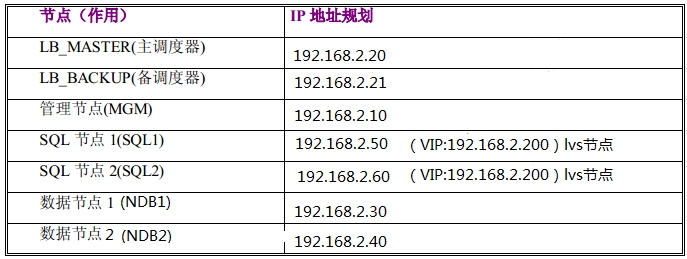
IP Planning:
IV. Configuration (Please uninstall all MySQL-related RPM packages first)
1. LB-Master and LB-Backup Configuration
(1) Install keepalived and ipvsadm on LB-Master and LB-Backup
- # yum groupinstall “Additional Development” // Install development tools
- # yum groupinstall “Development tools”
- # tar -zxvf keepalived-1.2.1.tar.gz -C /usr/local/src/
- # cd /usr/local/src/keepalived-1.2.1
- # ./configure
- Keepalived configuration
- ————————
- Keepalived version : 1.2.1
- Compiler : gcc
- Compiler flags : -g -O2
- Extra Lib : -lpopt -lssl -lcrypto
- Use IPVS Framework : No // Configuration error occurred
- IPVS sync daemon support : No
- Use VRRP Framework : Yes
- Use Debug flags : No
- Solution:
- # yum install kernel-devel ipvsadm
- # ln -s /usr/src/kernels/2.6.32-358.el6.i686/ /usr/src/linux
- # ./configure // Configure environment again
- # make // Compile
- # make install // Install
- # cd /usr/local/etc // Default keepalived installation path
- # ll
- drwxr-xr-x. 3 root root 4096 May 24 00:37 keepalived
- drwxr-xr-x. 3 root root 4096 May 24 00:29 rc.d
- drwxr-xr-x. 2 root root 4096 May 24 00:29 sysconfig
- Configure for system service startup
- # cp /usr/local/etc/rc.d/init.d/keepalived /etc/rc.d/init.d/
- # cp /usr/local/etc/sysconfig/keepalived /etc/sysconfig/
- # mkdir /etc/keepalived
- # cp /usr/local/etc/keepalived/keepalived.conf /etc/keepalived/
- # cp /usr/local/sbin/keepalived /usr/sbin/
(2) keepalived main configuration file for LB-Master and LB-Backup
- # cat /etc/keepalived/keepalived.conf
- # Configuration File for keepalived
- # global define
- global_defs {
- router_id HaMySQL_1
- }
- vrrp_sync_group VGM {
- group {
- VI_MYSQL
- }
- }
- vrrp_instance VI_MYSQL {
- state MASTER // Set to BACKUP on LB-Backup
- interface eth0
- lvs_sync_daemon_interface eth0
- virtual_router_id 55
- priority 100 // Set to 90 on LB-Backup
- advert_int 5
- authentication {
- auth_type PASS
- auth_pass 123456
- }
- virtual_ipaddress {
- 192.168.2.200/24 dev eth0
- }
- }
- ########## LVS MySQL Start ###########
- virtual_server 192.168.2.200 3306 {
- delay_loop 6
- lb_algo rr
- lb_kind DR
- persistence_timeout 6
- protocol TCP
- real_server 192.168.2.50 3306 {
- weight 100
- TCP_CHECK {
- connect_timeout 3
- nb_get_retry 3
- delay_before_retry 3
- connect_port 3306
- }
- }
- real_server 192.168.2.60 3306 {
- weight 100
- TCP_CHECK {
- connect_timeout 3
- nb_get_retry 3
- delay_before_retry 3
- connect_port 3306
- }
- }
- }
- ########## LVS MySQL END #############
2. MGM Configuration
(1) Install Management Node
- # rpm -ivh MySQL-Cluster-gpl-management-7.1.31-1.el6.i686.rpm
- # rpm -ivh MySQL-Cluster-gpl-tools-7.1.31-1.el6.i686.rpm
- # mkdir /etc/mysql-cluster
(2) Configure Management Node
- # vim /etc/mysql-cluster/config.ini // Add the following content
- [ndbd default]
- NoOfReplicas=2
- DataMemory=80M
- IndexMemory=18M
- # TCP/IP options:
- [tcp default]
- portnumber=2202
- # Management process options:
- [ndb_mgmd]
- id=1
- hostname=192.168.2.10
- datadir=/var/lib/mysql-cluster
- # Options for data node
- [ndbd]
- id=2
- hostname=192.168.2.30
- datadir=/var/lib/mysql
- [ndbd]
- id=3
- hostname=192.168.2.40
- datadir=/var/lib/mysql
- [mysqld]
- id=4
- hostname=192.168.2.50
- [mysqld]
- id=5
- hostname=192.168.2.60
(3) Start Management Node
- # mkdir /var/lib/mysql-cluster
- # ndb_mgmd -f /etc/mysql-cluster/config.ini
- MySQL Cluster Management Server mysql-5.1.73 ndb-7.1.31
- # netstat -tupln
- tcp 0 0 0.0.0.0:1186 0.0.0.0:* LISTEN 17629/ndb_mgmd
3. Data Node (NDB1 and NDB2) Configuration
(1) Install Data Node
- # rpm -ivh MySQL-Cluster-gpl-storage-7.1.31-1.el6.i686.rpm
- # mkdir /var/lib/mysql
(2) Configure Data Node
- # vim /etc/my.cnf
- [mysqld]
- datadir=/var/lib/mysql
- socket=/var/lib/mysql/mysql.sock
- user=mysql
- # Disabling symbolic-links is recommended to prevent assorted security risks
- symbolic-links=0
- [mysqld_safe]
- log-error=/var/log/mysqld.log
- pid-file=/var/run/mysqld/mysqld.pid
- [mysql_cluster]
- ndb-connectstring=192.168.2.10
(3) Start Data Node
- # ndbd –initial // NDB1
- 2014–05–28 00:32:17 [ndbd] INFO — Angel connected to ‘192.168.2.10:1186’
- 2014–05–28 00:32:17 [ndbd] INFO — Angel allocated nodeid: 2
- # ndbd –initial // NDB2
- 2014–05–28 00:33:08 [ndbd] INFO — Angel connected to ‘192.168.2.10:1186’
- 2014–05–28 00:33:08 [ndbd] INFO — Angel allocated nodeid: 3
4. SQL Node (SQL1 and SQL2) Configuration
Network Interface and ARP Suppression Settings
Add a lo:0 interface on top of the existing network interface
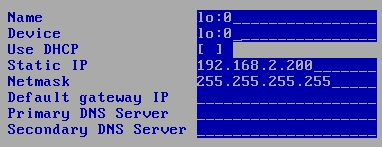
- # vim /etc/sysctl.conf // Add the following two lines
- net.ipv4.conf.all.arp_announce = 2
- net.ipv4.conf.all.arp_ignore = 1
- # sysctl -p
(1) Install SQL Node
- # rpm -ivh MySQL-Cluster-gpl-client-7.1.31-1.el6.i686.rpm
- # rpm -ivh MySQL-Cluster-gpl-server-7.1.31-1.el6.i686.rpm // If error occurs, uninstall MySQL-related rpm packages
(2) Configure SQL Node
- # The MySQL server
- [mysqld]
- port = 3306
- socket=/var/lib/mysql/mysql.sock
- ndbcluster
- default-storage-engine=NDBCLUSTER
- skip-name-resolve
- [mysql_cluster]
- ndb-connectstring=192.168.2.10
(3) Start SQL Node
- # service mysql start // SQL1
- Starting MySQL.. SUCCESS!
- # service mysql start // SQL2, if unable to start, run pkill -9 mysql then restart
- Starting MySQL SUCCESS!
- # netstat -tupln |grep mysql
- tcp 0 0 0.0.0.0:3306 0.0.0.0:* LISTEN 3475/mysqld
(4) Configure Remote Connection (Same configuration for SQL1 and SQL2)
- # mysql
- mysql> grant all on *.* to ‘nuo’@‘%’ identified by ‘123’;
- mysql> flush privileges;
Startup order must be followed: MGM → NDB → SQL
V. Check Status
1. Check MGM Status
- # ndb_mgm
- — NDB Cluster — Management Client —
- ndb_mgm> show
- Connected to Management Server at: localhost:1186
- Cluster Configuration
- ———————
- [ndbd(NDB)] 2 node(s)
- id=2 @192.168.2.30 (mysql-5.1.73 ndb-7.1.31, Nodegroup: 0, *)
- id=3 @192.168.2.40 (mysql-5.1.73 ndb-7.1.31, Nodegroup: 0)
- [ndb_mgmd(MGM)] 1 node(s)
- id=1 @192.168.2.10 (mysql-5.1.73 ndb-7.1.31)
- [mysqld(API)] 2 node(s)
- id=4 @192.168.2.50 (mysql-5.1.73 ndb-7.1.31)
- id=5 @192.168.2.60 (mysql-5.1.73 ndb-7.1.31)
2. Check LB-Master Status
- # service keepalived start
- Starting keepalived: [ OK ]
- # ip addr
- 1: lo: <LOOPBACK,UP,LOWER_UP> mtu 16436 qdisc noqueue state UNKNOWN
- link/loopback 00:00:00:00:00:00 brd 00:00:00:00:00:00
- inet 127.0.0.1/8 scope host lo
- inet6 ::1/128 scope host
- valid_lft forever preferred_lft forever
- 2: eth0: <BROADCAST,MULTICAST,UP,LOWER_UP> mtu 1500 qdisc pfifo_fast state UNKNOWN qlen 1000
- link/ether 00:0c:29:22:3d:01 brd ff:ff:ff:ff:ff:ff
- inet 192.168.2.20/24 brd 192.168.2.255 scope global eth0
- inet 192.168.2.200/24 scope global secondary eth0
- inet6 fe80::20c:29ff:fe22:3d01/64 scope link
- valid_lft forever preferred_lft forever
- # ipvsadm
- IP Virtual Server version 1.2.1 (size=4096)
- Prot LocalAddress:Port Scheduler Flags
- -> RemoteAddress:Port Forward Weight ActiveConn InActConn
- TCP 192.168.2.200:mysql rr persistent 6
- -> 192.168.2.50:mysql Route 100 0 0
- -> 192.168.2.60:mysql Route 100 0 0
3. Check LB-Backup Status
- # service keepalived start
- Starting keepalived: [ OK ]
- # ip addr
- 1: lo: <LOOPBACK,UP,LOWER_UP> mtu 16436 qdisc noqueue state UNKNOWN
- link/loopback 00:00:00:00:00:00 brd 00:00:00:00:00:00
- inet 127.0.0.1/8 scope host lo
- inet6 ::1/128 scope host
- valid_lft forever preferred_lft forever
- 2: eth0: <BROADCAST,MULTICAST,UP,LOWER_UP> mtu 1500 qdisc pfifo_fast state UNKNOWN qlen 1000
- link/ether 00:0c:29:27:e1:98 brd ff:ff:ff:ff:ff:ff
- inet 192.168.2.21/24 brd 192.168.2.255 scope global eth0
- inet6 fe80::20c:29ff:fe27:e198/64 scope link
- valid_lft forever preferred_lft forever
- # ipvsadm
- IP Virtual Server version 1.2.1 (size=4096)
- Prot LocalAddress:Port Scheduler Flags
- -> RemoteAddress:Port Forward Weight ActiveConn InActConn
- TCP 192.168.2.200:mysql rr persistent 6
- -> 192.168.2.50:mysql Route 100 0 0
- -> 192.168.2.60:mysql Route 100 0 0
VI. Testing
1. Client 1 (CentOS 6.4 32-bit, IP: 192.168.2.80/24)
- # yum install mysql
- # mysql -h 192.168.2.200 -u nuo -p
- Enter password:
- mysql> show databases;
- +——————–+
- | Database |
- +——————–+
- | information_schema |
- | mysql |
- | ndbinfo |
- | test |
- +——————–+
- mysql> create database t;
- mysql> use t;
- mysql> create table t2(id int);
- mysql> insert into t2 values(10);
- mysql> insert into t2 values(20);
2. LB-Master Connection Status
- # ipvsadm
- IP Virtual Server version 1.2.1 (size=4096)
- Prot LocalAddress:Port Scheduler Flags
- -> RemoteAddress:Port Forward Weight ActiveConn InActConn
- TCP 192.168.2.200:mysql rr persistent 6
- -> 192.168.2.50:mysql Route 100 1 0
- -> 192.168.2.60:mysql Route 100 0 0
- # ipvsadm -lcn
- IPVS connection entries
- pro expire state source virtual destination
- TCP 14:48 ESTABLISHED 192.168.2.80:49993 192.168.2.200:3306 192.168.2.50:3306
- TCP 00:54 NONE 192.168.2.80:0 192.168.2.200:3306 192.168.2.50:3306
3. Client 2 (CentOS 6.4 32-bit, IP: 192.168.2.81/24)
- # yum install mysql
- # mysql -h 192.168.2.200 -u nuo -p
- Enter password:
- mysql> show databases;
- +——————–+
- | Database |
- +——————–+
- | information_schema |
- | mysql |
- | ndbinfo |
- | t |
- | test |
- +——————–+
- mysql> use t;
- mysql> select * from t2;
- +——+
- | id |
- +——+
- | 20 |
- | 10 |
- +——+
4. LB-Master Connection Status
- # ipvsadm -lcn
- IPVS connection entries
- pro expire state source virtual destination
- TCP 00:36 NONE 192.168.2.81:0 192.168.2.200:3306 192.168.2.60:3306
- TCP 14:18 ESTABLISHED 192.168.2.81:42435 192.168.2.200:3306 192.168.2.60:3306
Summary: After inserting data on Client 1, the server shows Client 1 is connected to SQL1 (192.168.2.50). When querying on Client 2, it can retrieve the data inserted by Client 1, and the server shows Client 2 is connected to SQL2 (192.168.2.60). Therefore, the data is synchronized and consistent.
51CTO Blog: http://yinuoqianjin.blog.51cto.com/8360868/1418711