

Keepalived Dual-Machine Hot Standby
Here we will only use Keepalived for dual-machine hot standby, i.e., ensuring high availability of the servers, without worrying about anything else. You might say that this approach is rarely used in real-world applications, but you’d be wrong. There are indeed cases where Keepalived is used solely for dual-machine hot standby, and I’ve encountered several such scenarios. Below is a summary of a few cases I’ve come across.
I. Application Scenarios for Keepalived Dual-Machine Hot Standby
1. Websites with low traffic and light load, but extremely high reliability requirements for the servers, such as real-time online OA systems, government department website systems, hospital real-time medical reporting systems, public security online case reporting systems, stock market backend website systems, etc. Their load is not heavy, but reliability requirements are extremely high.
2. Organizations with money to burn, typically government enterprises, public schools, etc.
II. Features, Advantages, and Disadvantages of Keepalived Dual-Machine Hot Standby
Features:
1. At least two servers are required, one acting as the master providing services at all times, and the other as the backup remaining idle, only stepping in when the primary server goes down. This is a typical dual-machine hot standby setup.
2. Ability to determine whether services are available based on requirements, and switch immediately when unavailable.
Advantages and Disadvantages:
Advantages: Data synchronization is very simple. Unlike load balancing, which has very high data consistency requirements and is relatively complex to implement and maintain, dual-machine hot standby can be achieved with rsync, making operation and maintenance very simple.
Disadvantages: Servers are somewhat wasted, as one is always idle.
III. Keepalived Dual-Machine Hot Standby Configuration
First, let’s draw a dual-machine hot standby topology diagram:
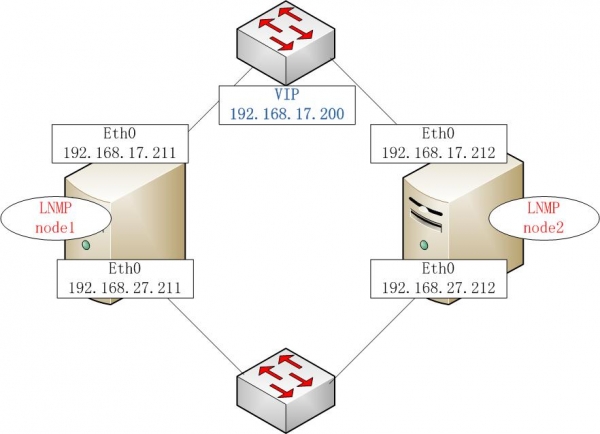
Here I will only write the final implementation configuration. For theoretical knowledge about Keepalived, please refer to “Keepalived Principles and Practical Guide“.
1. This example uses Keepalived to implement dual-machine hot standby for two LNMP (Linux + Nginx + MySQL + PHP) architecture servers.
For LNMP configuration, please refer to: “LNMP Configuration Guide – First Edition“.
2. Keepalived Dual-Machine Installation and Configuration
1) Keepalived Installation
Keepalived official website: http://www.keepalived.org/download.html, where you can download the latest version of Keepalived.
Operating System: CentOS 5.5 32-bit
System Installation: Minimal installation, i.e., removing all components.
Environment Configuration: Install make, gcc, openssl, openssl-devel, etc.
- yum -y install gcc make openssl openssl-devel wget kernel-devel
- mkdir -p /usr/local/src/hasoft
- cd /usr/local/src/hasoft
- wget http://www.keepalived.org/software/keepalived-1.2.2.tar.gz
- tar -zxvf keepalived-1.2.2.tar.gz
- cd keepalived-1.2.2
- ./configure –prefix=/usr/local/keepalived –with-kernel-dir=/usr/src/kernels/2.6.18-238.19.1.el5-i686/
Copy code
After pre-compilation, the following appears:
- Keepalived configuration
- ————————
- Keepalived version : 1.2.2
- Compiler : gcc
- Compiler flags : -g -O2 -DETHERTYPE_IPV6=0x86dd
- Extra Lib : -lpopt -lssl -lcrypto
- Use IPVS Framework : Yes
- IPVS sync daemon support : Yes
- IPVS use libnl : No
- Use VRRP Framework : Yes
- Use Debug flags : No
Copy code
- make && make install
Copy code
Note here: the above is a general installation method. If you are not using LVS, you can omit LVS, i.e.:
./configure –prefix=/usr/local/keepalived –with-kernel-dir=/usr/src/kernels/2.6.18-238.19.1.el5-i686/ –disable-lvs-syncd –disable-lvs
But this doesn’t matter; just follow my configuration. However, if you have integrated LVS, do not add these two parameters.
Organize management files:
cp /usr/local/keepalived/sbin/keepalived /usr/sbin/
cp /usr/local/keepalived/etc/sysconfig/keepalived /etc/sysconfig/
cp /usr/local/keepalived/etc/rc.d/init.d/keepalived /etc/init.d/
Create the configuration file directory (note: Keepalived configuration files are by default in the /etc/keepalived/ directory)
mkdir -p /etc/keepalived/
Install this way on both servers (both nodes).
2) Configuration
Node A configuration is as follows:
vi /etc/keepalived/keepalived.conf
- global_defs
- {
- notification_email
- {
- [email protected]
- [email protected]
- }
- notification_email_from [email protected]
- smtp_server 127.0.0.1
- stmp_connect_timeout 30
- router_id lnmp_node1
- }
- vrrp_instance lnmp {
- state MASTER
- interface eth0
- virtual_router_id 100
- priority 200
- advert_int 5
- track_interface {
- eth0
- eth1
- }
- authentication {
- auth_type PASS
- auth_pass 123456
- }
- virtual_ipaddress {
- 192.168.17.200
- }
- }
Copy code
Node B configuration is as follows:
vi /etc/keepalived/keepalived.conf
- global_defs
- {
- notification_email
- {
- [email protected]
- [email protected]
- }
- notification_email_from [email protected]
- smtp_server 127.0.0.1
- stmp_connect_timeout 30
- router_id lnmp_node1
- }
- vrrp_instance lnmp {
- state MASTER
- interface eth0
- virtual_router_id 100
- priority 150
- advert_int 5
- track_interface {
- eth0
- eth1
- }
- authentication {
- auth_type PASS
- auth_pass 123456
- }
- virtual_ipaddress {
- 192.168.17.200
- }
- }
Copy code
IV. Startup and Debugging
Start on Node A:
/usr/local/keepalived/sbin/keepalived
Startup log:
Sep 8 18:26:02 centosa Keepalived_vrrp: Registering Kernel netlink reflector
Sep 8 18:26:02 centosa Keepalived_vrrp: Registering Kernel netlink command channel
Sep 8 18:26:02 centosa Keepalived_vrrp: Registering gratutious ARP shared channel
Sep 8 18:26:02 centosa Keepalived_vrrp: Opening file ‘/etc/keepalived/keepalived.conf’.
Sep 8 18:26:02 centosa Keepalived_vrrp: Configuration is using : 36076 Bytes
Sep 8 18:26:02 centosa Keepalived_vrrp: Using LinkWatch kernel netlink reflector…
Sep 8 18:26:02 centosa Keepalived: Starting VRRP child process, pid=5606
Sep 8 18:26:07 centosa Keepalived_vrrp: VRRP_Instance(lnmp) Transition to MASTER STATE
Sep 8 18:26:12 centosa Keepalived_vrrp: VRRP_Instance(lnmp) Entering MASTER STATE
Sep 8 18:26:12 centosa avahi-daemon[2528]: Registering new address record for 192.168.17.200 on eth0.
Start on Node B:
/usr/local/keepalived/sbin/keepalived
Auto-start on boot:
echo /usr/local/keepalived/sbin/keepalived >> /etc/rc.local
Startup log:
Sep 8 18:30:02 centosb Keepalived: Starting Keepalived v1.2.2 (09/08,2011)
Sep 8 18:30:02 centosb Keepalived: Starting Healthcheck child process, pid=5837
Sep 8 18:30:02 centosb Keepalived_vrrp: Registering Kernel netlink reflector
Sep 8 18:30:02 centosb Keepalived_vrrp: Registering Kernel netlink command channel
Sep 8 18:30:02 centosb Keepalived_vrrp: Registering gratutious ARP shared channel
Sep 8 18:30:02 centosb Keepalived: Starting VRRP child process, pid=5839
Sep 8 18:30:02 centosb kernel: IPVS: Registered protocols (TCP, UDP, AH, ESP)
Sep 8 18:30:02 centosb kernel: IPVS: Connection hash table configured (size=4096, memory=32Kbytes)
Sep 8 18:30:02 centosb kernel: IPVS: ipvs loaded.
Sep 8 18:30:02 centosb Keepalived_healthcheckers: Registering Kernel netlink reflector
Sep 8 18:30:02 centosb Keepalived_healthcheckers: Registering Kernel netlink command channel
Sep 8 18:30:02 centosb Keepalived_healthcheckers: Opening file ‘/etc/keepalived/keepalived.conf’.
Sep 8 18:30:02 centosb Keepalived_vrrp: Opening file ‘/etc/keepalived/keepalived.conf’.
Sep 8 18:30:02 centosb Keepalived_vrrp: Configuration is using : 36252 Bytes
Sep 8 18:30:02 centosb Keepalived_vrrp: Using LinkWatch kernel netlink reflector…
Sep 8 18:30:02 centosb Keepalived_healthcheckers: Configuration is using : 6271 Bytes
Sep 8 18:30:02 centosb Keepalived_healthcheckers: Using LinkWatch kernel netlink reflector…
Sep 8 18:30:02 centosb Keepalived_vrrp: VRRP_Instance(lnmp) Entering BACKUP STATE
From the logs, we can see that both started without issues, and the election was completed according to the priorities I set, with each assuming its respective state.
Test failover by shutting down Node A’s network interface:
ifdown eth0
Observe Node B’s logs:
Sep 8 18:32:55 centosb Keepalived_vrrp: VRRP_Instance(lnmp) Transition to MASTER STATE
Sep 8 18:33:00 centosb Keepalived_vrrp: VRRP_Instance(lnmp) Entering MASTER STATE
Sep 8 18:33:00 centosb avahi-daemon[2531]: Registering new address record for 192.168.17.200 on eth0.
Test failback by bringing up Node A’s network interface:
ifup eth0
Observe Node B’s logs:
Sep 8 18:33:31 centosb Keepalived_vrrp: VRRP_Instance(lnmp) Received higher prio advert
Sep 8 18:33:31 centosb Keepalived_vrrp: VRRP_Instance(lnmp) Entering BACKUP STATE
Sep 8 18:33:31 centosb avahi-daemon[2531]: Withdrawing address record for 192.168.17.200 on eth0.
“Received higher prio advert”: indicates receiving a higher priority advertisement.
Withdrawing:means withdrawing. The switching process is clear at a glance.
OK, the installation part is complete. Now let’s look at how to monitor services. Here we have only monitored network failures and the Keepalived process itself. When the network or Keepalived process has issues, failover occurs. But Node A also has many services running, such as Nginx, PHP, and MySQL processes. What if these processes have issues or respond too slowly under high load? How does the failover happen? This is where scripts come in. Let’s see how Keepalived uses scripts to monitor and switch servers.
Write a script to monitor the three services in real time, and trigger a failover if any one of them has issues:
mkdir /root/shell/
cd /root/shell
vi keepcheck.sh
- #!/bin/bash
- while :
- do
- mysqlcheck=`/usr/local/lnmp/mysql/bin/mysqladmin -uroot ping 2>&1`
- mysqlcode=`echo $?`
- phpcheck=`ps -C php-fpm –no-header | wc -l`
- nginxcheck=`ps -C nginx –no-header | wc -l`
- keepalivedcheck=`ps -C keepalived –no-header | wc -l`
- if [ $nginxcheck -eq 0 ]|| [ $phpcheck -eq 0 ]||[ $mysqlcode -ne 0 ];then
- if [ $keepalivedcheck -ne 0 ];then
- killall -TERM keepalived
- else
- echo “keepalived is stoped”
- fi
- else
- if [ $keepalivedcheck -eq 0 ];then
- /etc/init.d/keepalived start
- else
- echo “keepalived is running”
- fi
- fi
- sleep 5
- done
Copy code
Note: if /etc/init.d/keepalived start doesn’t work, you can use the /usr/local/keepalived/sbin/keepalived binary to start it directly.
Start the script:
- chmod +x /root/shell/keepcheck.sh
- nohup sh /root/shell/keepcheck.sh &
Copy code
Node B also uses this script.
Add to /etc/rc.local for auto-start on boot:
- echo “nohup sh /root/shell/keepcheck.sh &” >> /etc/rc.local
Copy code
Now you can test.
This article is complete. This configuration can be used in production environments. I have configured my own environment this way, but different businesses have different environments, so be sure to adjust according to your needs. Do not follow blindly!