

I believe many webmasters using phpcms v9 are not programmers, and I too am a web designer, so I can handle template creation fairly well. But when it comes to writing code myself, it gives me a splitting headache. Previously, our company’s website was built by someone else using DedeCMS. When I took it over, I found the templates were a complete mess, so I decided to do a full revamp. I searched online for CMS platforms, and the general consensus was that PHPCMS is far more advanced than DedeCMS, so I resolutely chose the new PHPCMS V9. Installation was pretty straightforward, and everything went smoothly. Later, when I was making a guestbook, I just couldn’t find the template. I looked everywhere — there were even templates for friend links and polls. I was baffled; how could there be no guestbook? It’s a basic requirement for a website. Then I searched on Baidu and Google and found a guestbook plugin that wasn’t even officially developed. Remembering the headache caused by a previous Q&A plugin I tried, I firmly decided not to download it. If it’s not there, it’s not there — no big deal.
Coincidentally, a few days ago, our company’s other website was also due for a revamp. I figured I’d stick with this CMS, after all, I’m quite familiar with it now, and it was a good chance to review the backend again. By chance, I stumbled upon a module called “Form Wizard” that I’d never used before and had no idea what it was for. Since I saw it, I went in to check it out. I added a form wizard and followed the steps one by one. I got more and more excited — isn’t this just a form submission feature?? Sure enough, after adding a few fields, my suspicion was confirmed. So this was the module that could create the guestbook function. Unbelievable!!! It turns out I just never associated “Form” with “Guestbook.” And the PHPCMS developers, really, why couldn’t they think more about others? Only a programmer would naturally connect “Forms” and “Guestbook” functionality.
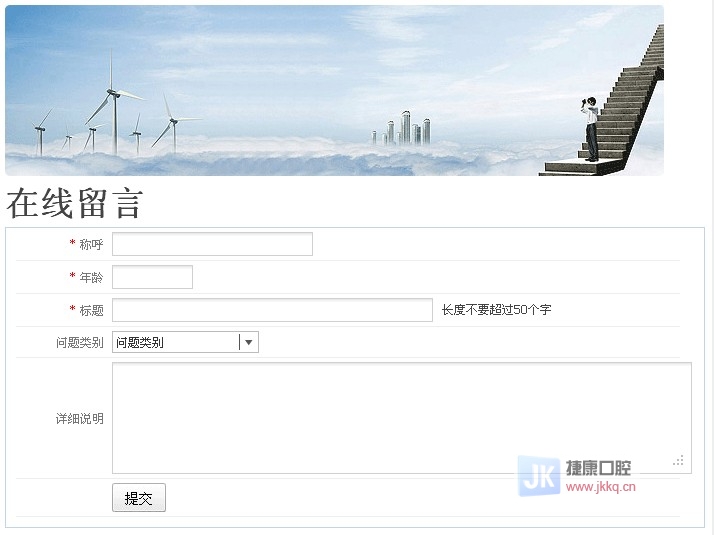
Alright, enough rambling. Let’s get to the point. Below, I’ll demonstrate how to make a guestbook.
1. Go to “Modules”
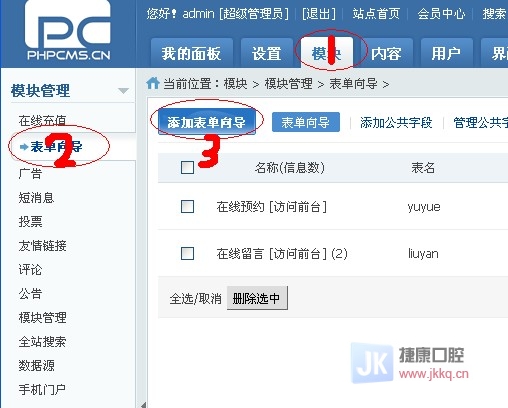
2. Select “Form Wizard”
3. Click “Add Form Wizard.” In the “Name” field, enter “Guestbook,” and in the “Table Name” field, enter “liuyanban.” Then, under “Allow guests to submit forms,” choose “Yes.” Confirm.
4. Now an entry for “Guestbook” will appear. Then, find the “Add Field” option behind it.
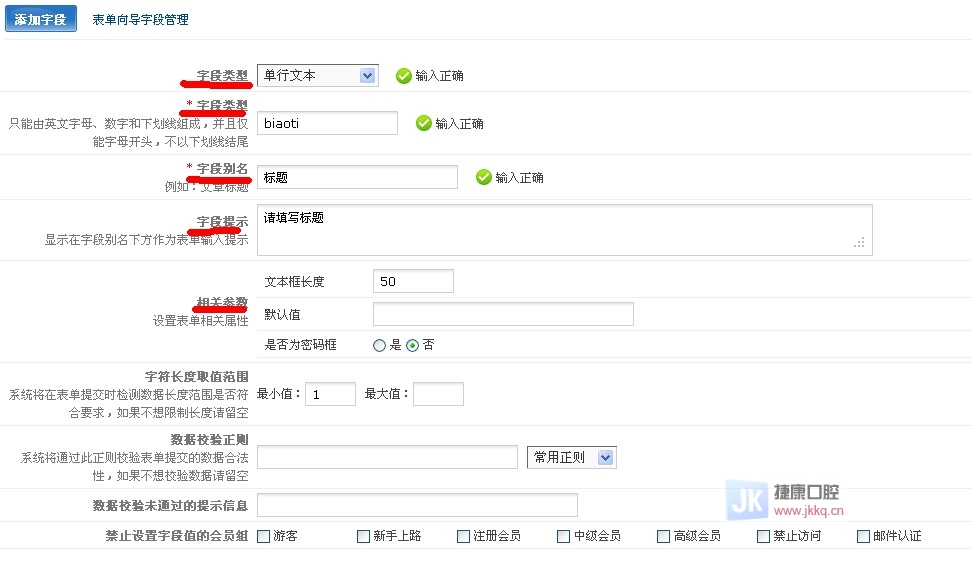
5. Click “Add Field” to enter. For the first row, “Field Type,” choose. The first column we typically see on a guestbook is “Title,” right? And “Title” is a “Single-line Text.” So select “Single-line Text” here too. Then the second column “Field Name” — this is the column name stored in the database to hold the “Title” data. I’ll fill in the pinyin abbreviation for “Title”: biaoti. Next is “Field Alias,” where we just write “Title.” Below that is “Field Tip,” which you can leave blank, but for a better user experience, we should add a hint. Let’s enter “Please fill in the title.” Next is filling in the “Related Parameters.” The “Textbox Length” for “Title” is generally set to 50. The default value is optional. Leave everything else as is and just submit. After submitting, we’ll see the field we just added has appeared. We can click the “Preview” button above to see the effect. What does it look like? Has an input field for the title appeared?
6. Next, we continue to add fields. According to our needs, we add fields like Name, Gender, Phone Number, Message Content, etc. Note that for “Name” and “Phone Number,” you can choose “Single-line Text” just like “Title.” For “Gender,” select “Options.” For “Message Content,” choose “Multi-line Text” or “Editor.”

7. After all fields are added, go back to “Modules” > “Form Wizard.” You’ll see a “Call” script right behind “Guestbook.” Place this script into the guestbook template page we create, and it’s ready to use!
By the same logic: we can also get creative and make some other forms ourselves.
Note: For related website building tips, please visit the Website Tutorials channel.