

[Article Author: Zhang Yan | Version: v6.3
Foreword: This is my sixth article on building an “Nginx + PHP (FastCGI)” web server. This series, one of the earliest domestic resources detailing the installation, configuration, and use of Nginx + PHP, has played a positive role in promoting Nginx’s adoption within China. This article may be updated with minor revisions; please bookmark the original link “http://blog.s135.com/nginx_php_v6/” for the latest content. The sixth article primarily introduces the new graceful restart method for Nginx 0.8.x, upgrades PHP to 5.2.14 with a PEAR fix, and upgrades the MySQL 5.1.x series to the 5.5.x series, which involves significant configuration file changes.
Links: 1st Edition, September 2007, 2nd Edition, December 2007, 3rd Edition, June 2008, 4th Edition, August 2008, 5th Edition, May 2009

Nginx ("engine x") is a high-performance HTTP and reverse proxy server, as well as an IMAP/POP3/SMTP proxy server. Nginx was developed by Igor Sysoev for Rambler.ru, Russia’s second most visited website, where it has been running for over three years. Igor released the source code under a BSD-like license.
Nginx’s superior performance and stability over Apache have led to its increasing adoption as a web server by domestic websites, including portal channels like Sina Blog, Sina Podcast, NetEase News, Tencent, Sohu Blog; video sharing sites like 6.cn, 56.com; well-known forums like the Discuz! Official Forum and SMTH Community; online game sites like Shanda Online and Kingsoft Xoyo; and emerging Web 2.0 sites like Douban, Renren, YUPOO Gallery, Kingsoft iCIBA, and Xunlei Online.
Official Chinese Nginx Wiki: http://wiki.nginx.org/NginxChs
Under high concurrent connections, Nginx is an excellent alternative to the Apache server. Nginx can also function as a Layer 7 load balancing server. According to my test results, Nginx 0.8.46 + PHP 5.2.14 (FastCGI) can handle over 30,000 concurrent connections, equivalent to 10 times that of Apache under identical conditions.
Based on my experience, a server with 4GB of RAM running Apache (prefork mode) can typically handle only 3,000 concurrent connections, as these consume over 3GB of memory, leaving 1GB for the system. I once had two Apache servers where the MaxClients setting in the configuration file was 4000; when Apache’s concurrent connections reached 3800, the server’s memory and swap space were exhausted, leading to a crash.
Under 30,000 concurrent connections, this Nginx 0.8.46 + PHP 5.2.14 (FastCGI) server, with 10 Nginx processes active, consumed 150MB of memory (15MB*10=150MB). The 64 running php-cgi processes consumed 1280MB of memory (20MB*64=1280M). Combined with the system’s own memory usage, the total consumption was under 2GB. If the server has less memory, you can easily run only 25 php-cgi processes, reducing the total php-cgi memory consumption to just 500MB.
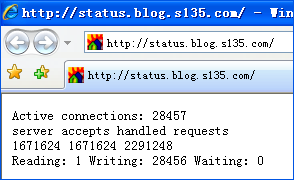
Under 30,000 concurrent connections, accessing PHP programs on the Nginx 0.8.46 + PHP 5.2.14 (FastCGI) server remained blazingly fast. The image below shows Nginx’s status monitoring page, displaying 28,457 active connections (details on configuring the Nginx monitoring page will be provided later in this article’s Nginx configuration file):
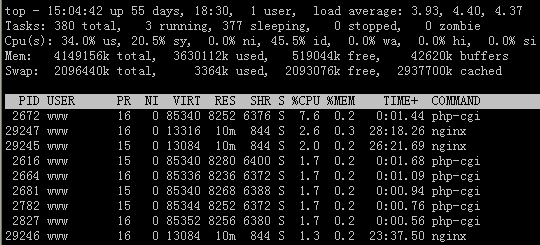
In my production environment, two Nginx + PHP5 (FastCGI) servers run multiple moderately complex pure PHP dynamic applications. A single Nginx + PHP5 (FastCGI) server’s processing capacity for PHP dynamic applications exceeded “700 requests per second“, equating to a daily capacity of 60 million visits (700*60*60*24=60,480,000) (more info here), while the server’s system load remained low:
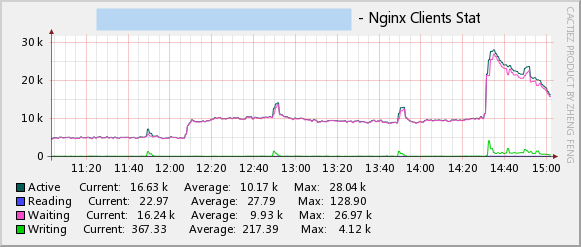
On September 3, 2009, at 2:30 PM, the Kingsoft game “JX Online III” underwent a 1-hour emergency maintenance (http://kefu.xoyo.com/gonggao/jx3/2009-09-03/750438.shtml). A massive influx of players flocked to the official website. The dynamic application Nginx server cluster, handling forums, comments, and customer service, saw each server’s active Nginx connections reach 28,000. This was the highest concurrency value the author encountered with Nginx in a production environment.
Below is a stress test using 100 concurrent connections against two servers behind the same load balancer VIP providing identical services; one running Nginx, the other Apache. Nginx handled over twice the number of requests per second compared to Apache, with significantly lower system load and CPU usage:
You can increase the connection count to 10,000~30,000 and stress test the phpinfo.php file on both Nginx and Apache. When accessing phpinfo.php on Nginx via a browser, everything functions normally. However, attempting to access the same file on the Apache server will result in a “page cannot be displayed” error. On a server with 4GB of RAM, even after optimization, Apache struggles to function normally under the stress of “webbench -c 30000 -t 60 http://xxx.xxx.xxx.xxx/phpinfo.php“, whereas a properly tuned Nginx can handle it.
webbench download link: http://blog.s135.com/post/288/
Note: When performing stress tests with webbench, the software itself consumes CPU and memory resources. For accurate testing, please install webbench on a separate server.
Test Results: ##### Nginx + PHP #####
Webbench – Simple Web Benchmark 1.5
Copyright (c) Radim Kolar 1997-2004, GPL Open Source Software.
Benchmarking: GET http://192.168.1.21/phpinfo.php
100 clients, running 30 sec.
Speed=102450 pages/min, 16490596 bytes/sec.
Requests: 51225 susceed, 0 failed.
top – 14:06:13 up 27 days, 2:25, 2 users, load average: 14.57, 9.89, 6.51
Tasks: 287 total, 4 running, 283 sleeping, 0 stopped, 0 zombie
Cpu(s): 49.9% us, 6.7% sy, 0.0% ni, 41.4% id, 1.1% wa, 0.1% hi, 0.8% si
Mem: 6230016k total, 2959468k used, 3270548k free, 635992k buffers
Swap: 2031608k total, 3696k used, 2027912k free, 1231444k cached
Test Results: ##### Apache + PHP #####
Webbench – Simple Web Benchmark 1.5
Copyright (c) Radim Kolar 1997-2004, GPL Open Source Software.
Benchmarking: GET http://192.168.1.27/phpinfo.php
100 clients, running 30 sec.
Speed=42184 pages/min, 31512914 bytes/sec.
Requests: 21092 susceed, 0 failed.
top – 14:06:20 up 27 days, 2:13, 2 users, load average: 62.15, 26.36, 13.42
Tasks: 318 total, 7 running, 310 sleeping, 0 stopped, 1 zombie
Cpu(s): 80.4% us, 10.6% sy, 0.0% ni, 7.9% id, 0.1% wa, 0.1% hi, 0.9% si
Mem: 6230016k total, 3075948k used, 3154068k free, 379896k buffers
Swap: 2031608k total, 12592k used, 2019016k free, 1117868k cached
Why is Nginx’s performance so much higher than Apache’s? This is thanks to Nginx using the latest epoll (Linux 2.6 kernel) and kqueue (FreeBSD) network I/O models, whereas Apache uses the traditional select model. Currently, high-concurrency software on Linux like Squid and Memcached all use the epoll network I/O model.
For handling reads and writes of a large number of connections, the select network I/O model used by Apache is very inefficient. Let’s use an analogy to explain the difference between Apache’s select model and Nginx’s epoll model:
Suppose you are studying at a university and live in a dormitory building with many rooms. Your friend comes to find you. The select-version dorm manager would take your friend door-to-door searching every room until they find you. The epoll-version dorm manager, however, would first record every student’s room number. When your friend comes, she just tells your friend which room you are in without having to personally lead your friend through the entire building searching. If 10,000 people come looking for their classmates living in this building, whose efficiency is higher — the select-version or the epoll-version dorm manager? The answer is self-evident. Likewise, in high-concurrency servers, polling I/O is one of the most time-consuming operations; the performance difference between select and epoll is equally clear.
Installation Steps:
(System Requirements: Linux 2.6+ kernel. The Linux OS used in this article is CentOS 5.3; also successfully installed on RedHat AS4)
1. Obtain Related Open-Source Programs:
1. [For CentOS] Use CentOS’s built-in yum command to install and upgrade required libraries (For RedHat and other Linux distributions, you can find the RPM packages for these libraries on the installation disc to install them):
LANG=C
yum -y install gcc gcc-c++ autoconf libjpeg libjpeg-devel libpng libpng-devel freetype freetype-devel libxml2 libxml2-devel zlib zlib-devel glibc glibc-devel glib2 glib2-devel bzip2 bzip2-devel ncurses ncurses-devel curl curl-devel e2fsprogs e2fsprogs-devel krb5 krb5-devel libidn libidn-devel openssl openssl-devel openldap openldap-devel nss_ldap openldap-clients openldap-servers
2. [For RedHat] For RedHat and other Linux distributions, you can find the RPM packages for these libraries on the installation disc (check if required RPMs exist beforehand using commands like “rpm -qa | grep libjpeg”; typically the “xxx-devel” packages are missing and need installing). RedHat can directly use CentOS RPM packages. Here are the RPM download URLs:
①、RedHat AS4 & CentOS 4
http://mirrors.163.com/centos/4/os/i386/CentOS/RPMS/
http://mirrors.163.com/centos/4/os/x86_64/CentOS/RPMS/
②、RedHat AS5 & CentOS 5
http://mirrors.163.com/centos/5/os/i386/CentOS/
http://mirrors.163.com/centos/5/os/x86_64/CentOS/
③、RPM Package Search Sites
http://rpm.pbone.net/
http://www.rpmfind.net/
④、RedHat AS4 System Environment, typically missing support packages installation:
Ⅰ、i386 System
rpm -ivh libjpeg-devel-6b-33.i386.rpm
wget http://blog.s135.com/soft/linux/nginx_php/rpm/i386/freetype-devel-2.1.9-1.i386.rpm
rpm -ivh freetype-devel-2.1.9-1.i386.rpm
wget http://blog.s135.com/soft/linux/nginx_php/rpm/i386/libpng-devel-1.2.7-1.i386.rpm
rpm -ivh libpng-devel-1.2.7-1.i386.rpm
Ⅱ、x86_64 System
rpm -ivh libjpeg-devel-6b-33.x86_64.rpm
wget http://blog.s135.com/soft/linux/nginx_php/rpm/x86_64/freetype-devel-2.1.9-1.x86_64.rpm
rpm -ivh freetype-devel-2.1.9-1.x86_64.rpm
wget http://blog.s135.com/soft/linux/nginx_php/rpm/x86_64/libpng-devel-1.2.7-1.x86_64.rpm
rpm -ivh libpng-devel-1.2.7-1.x86_64.rpm
3. [Applicable to CentOS, RedHat, and other Linux operating systems] Download the program source packages:
All open-source software mentioned in this article are the latest stable versions as of July 26, 2010.
①. Download from the software’s official website:
cd /data0/software
wget http://sysoev.ru/nginx/nginx-0.8.46.tar.gz
wget http://www.php.net/get/php-5.2.14.tar.gz/from/this/mirror
wget http://php-fpm.org/downloads/php-5.2.14-fpm-0.5.14.diff.gz
wget http://dev.mysql.com/get/Downloads/MySQL-5.5/mysql-5.5.3-m3.tar.gz/from/http://mysql.he.net/
wget http://ftp.gnu.org/pub/gnu/libiconv/libiconv-1.13.1.tar.gz
wget "http://downloads.sourceforge.net/mcrypt/libmcrypt-2.5.8.tar.gz?modtime=1171868460&big_mirror=0"
wget "http://downloads.sourceforge.net/mcrypt/mcrypt-2.6.8.tar.gz?modtime=1194463373&big_mirror=0"
wget http://pecl.php.net/get/memcache-2.2.5.tgz
wget "http://downloads.sourceforge.net/mhash/mhash-0.9.9.9.tar.gz?modtime=1175740843&big_mirror=0"
wget ftp://ftp.csx.cam.ac.uk/pub/software/programming/pcre/pcre-8.10.tar.gz
wget http://bart.eaccelerator.net/source/0.9.6.1/eaccelerator-0.9.6.1.tar.bz2
wget http://pecl.php.net/get/PDO_MYSQL-1.0.2.tgz
wget http://blog.s135.com/soft/linux/nginx_php/imagick/ImageMagick.tar.gz
wget http://pecl.php.net/get/imagick-2.3.0.tgz
②. Download from blog.s135.com (more stable; downloading the following software is only allowed from this site, or via commands like Wget or Curl under Linux/Unix):
cd /data0/software
wget http://blog.s135.com/soft/linux/nginx_php/nginx/nginx-0.8.46.tar.gz
wget http://blog.s135.com/soft/linux/nginx_php/php/php-5.2.14.tar.gz
wget http://blog.s135.com/soft/linux/nginx_php/phpfpm/php-5.2.14-fpm-0.5.14.diff.gz
wget http://blog.s135.com/soft/linux/nginx_php/mysql/mysql-5.5.3-m3.tar.gz
wget http://blog.s135.com/soft/linux/nginx_php/libiconv/libiconv-1.13.1.tar.gz
wget http://blog.s135.com/soft/linux/nginx_php/mcrypt/libmcrypt-2.5.8.tar.gz
wget http://blog.s135.com/soft/linux/nginx_php/mcrypt/mcrypt-2.6.8.tar.gz
wget http://blog.s135.com/soft/linux/nginx_php/memcache/memcache-2.2.5.tgz
wget http://blog.s135.com/soft/linux/nginx_php/mhash/mhash-0.9.9.9.tar.gz
wget http://blog.s135.com/soft/linux/nginx_php/pcre/pcre-8.10.tar.gz
wget http://blog.s135.com/soft/linux/nginx_php/eaccelerator/eaccelerator-0.9.6.1.tar.bz2
wget http://blog.s135.com/soft/linux/nginx_php/pdo/PDO_MYSQL-1.0.2.tgz
wget http://blog.s135.com/soft/linux/nginx_php/imagick/ImageMagick.tar.gz
wget http://blog.s135.com/soft/linux/nginx_php/imagick/imagick-2.3.0.tgz
II. Install PHP 5.2.14 (FastCGI Mode)
1. Compile and install the support libraries required for PHP 5.2.14:
cd libiconv-1.13.1/
./configure –prefix=/usr/local
make
make install
cd ../
tar zxvf libmcrypt-2.5.8.tar.gz
cd libmcrypt-2.5.8/
./configure
make
make install
/sbin/ldconfig
cd libltdl/
./configure –enable-ltdl-install
make
make install
cd ../../
tar zxvf mhash-0.9.9.9.tar.gz
cd mhash-0.9.9.9/
./configure
make
make install
cd ../
ln -s /usr/local/lib/libmcrypt.la /usr/lib/libmcrypt.la
ln -s /usr/local/lib/libmcrypt.so /usr/lib/libmcrypt.so
ln -s /usr/local/lib/libmcrypt.so.4 /usr/lib/libmcrypt.so.4
ln -s /usr/local/lib/libmcrypt.so.4.4.8 /usr/lib/libmcrypt.so.4.4.8
ln -s /usr/local/lib/libmhash.a /usr/lib/libmhash.a
ln -s /usr/local/lib/libmhash.la /usr/lib/libmhash.la
ln -s /usr/local/lib/libmhash.so /usr/lib/libmhash.so
ln -s /usr/local/lib/libmhash.so.2 /usr/lib/libmhash.so.2
ln -s /usr/local/lib/libmhash.so.2.0.1 /usr/lib/libmhash.so.2.0.1
ln -s /usr/local/bin/libmcrypt-config /usr/bin/libmcrypt-config
tar zxvf mcrypt-2.6.8.tar.gz
cd mcrypt-2.6.8/
/sbin/ldconfig
./configure
make
make install
cd ../
2. Compile and Install MySQL 5.5.3-m3
/usr/sbin/useradd -g mysql mysql
tar zxvf mysql-5.5.3-m3.tar.gz
cd mysql-5.5.3-m3/
./configure –prefix=/usr/local/webserver/mysql/ –enable-assembler –with-extra-charsets=complex –enable-thread-safe-client –with-big-tables –with-readline –with-ssl –with-embedded-server –enable-local-infile –with-plugins=partition,innobase,myisammrg
make && make install
chmod +w /usr/local/webserver/mysql
chown -R mysql:mysql /usr/local/webserver/mysql
cd ../
Note: The following are additional steps. If you intend to run a MySQL database on this server, execute the steps below. If you only want PHP to support the MySQL extension library so it can connect to a MySQL database on another server, then the following two steps are not necessary.
①. Create the MySQL Database Storage Directory
mkdir -p /data0/mysql/3306/binlog/
mkdir -p /data0/mysql/3306/relaylog/
chown -R mysql:mysql /data0/mysql/
②. Initialize the Data Tables as the MySQL User:
③. Create the my.cnf Configuration File:
Enter the following content:
character-set-server = utf8
port = 3306
socket = /tmp/mysql.sock
[mysqld]
character-set-server = utf8
replicate-ignore-db = mysql
replicate-ignore-db = test
replicate-ignore-db = information_schema
user = mysql
port = 3306
socket = /tmp/mysql.sock
basedir = /usr/local/webserver/mysql
datadir = /data0/mysql/3306/data
log-error = /data0/mysql/3306/mysql_error.log
pid-file = /data0/mysql/3306/mysql.pid
open_files_limit = 10240
back_log = 600
max_connections = 5000
max_connect_errors = 6000
table_cache = 614
external-locking = FALSE
max_allowed_packet = 32M
sort_buffer_size = 1M
join_buffer_size = 1M
thread_cache_size = 300
#thread_concurrency = 8
query_cache_size = 512M
query_cache_limit = 2M
query_cache_min_res_unit = 2k
default-storage-engine = MyISAM
thread_stack = 192K
transaction_isolation = READ-COMMITTED
tmp_table_size = 246M
max_heap_table_size = 246M
long_query_time = 3
log-slave-updates
log-bin = /data0/mysql/3306/binlog/binlog
binlog_cache_size = 4M
binlog_format = MIXED
max_binlog_cache_size = 8M
max_binlog_size = 1G
relay-log-index = /data0/mysql/3306/relaylog/relaylog
relay-log-info-file = /data0/mysql/3306/relaylog/relaylog
relay-log = /data0/mysql/3306/relaylog/relaylog
expire_logs_days = 30
key_buffer_size = 256M
read_buffer_size = 1M
read_rnd_buffer_size = 16M
bulk_insert_buffer_size = 64M
myisam_sort_buffer_size = 128M
myisam_max_sort_file_size = 10G
myisam_repair_threads = 1
myisam_recover
interactive_timeout = 120
wait_timeout = 120
skip-name-resolve
#master-connect-retry = 10
slave-skip-errors = 1032,1062,126,1114,1146,1048,1396
#master-host = 192.168.1.2
#master-user = username
#master-password = password
#master-port = 3306
server-id = 1
innodb_additional_mem_pool_size = 16M
innodb_buffer_pool_size = 512M
innodb_data_file_path = ibdata1:256M:autoextend
innodb_file_io_threads = 4
innodb_thread_concurrency = 8
innodb_flush_log_at_trx_commit = 2
innodb_log_buffer_size = 16M
innodb_log_file_size = 128M
innodb_log_files_in_group = 3
innodb_max_dirty_pages_pct = 90
innodb_lock_wait_timeout = 120
innodb_file_per_table = 0
#log-slow-queries = /data0/mysql/3306/slow.log
#long_query_time = 10
[mysqldump]
quick
max_allowed_packet = 32M
④. Create a Shell Script to Manage the MySQL Database:
Enter the following content (the username ‘admin’ and password ‘12345678’ here will be created in the upcoming steps):
mysql_port=3306
mysql_username="admin"
mysql_password="12345678"
function_start_mysql()
{
printf "Starting MySQL…/n"
/bin/sh /usr/local/webserver/mysql/bin/mysqld_safe –defaults-file=/data0/mysql/${mysql_port}/my.cnf 2>&1 > /dev/null &
}
function_stop_mysql()
{
printf "Stoping MySQL…/n"
/usr/local/webserver/mysql/bin/mysqladmin -u ${mysql_username} -p${mysql_password} -S /tmp/mysql.sock shutdown
}
function_restart_mysql()
{
printf "Restarting MySQL…/n"
function_stop_mysql
sleep 5
function_start_mysql
}
function_kill_mysql()
{
kill -9 $(ps -ef | grep 'bin/mysqld_safe' | grep ${mysql_port} | awk '{printf $2}')
kill -9 $(ps -ef | grep 'libexec/mysqld' | grep ${mysql_port} | awk '{printf $2}')
}
if [ "$1" = "start" ]; then
function_start_mysql
elif [ "$1" = "stop" ]; then
function_stop_mysql
elif [ "$1" = "restart" ]; then
function_restart_mysql
elif [ "$1" = "kill" ]; then
function_kill_mysql
else
printf "Usage: /data0/mysql/${mysql_port}/mysql {start|stop|restart|kill}/n"
fi
⑤、Grant the shell script executable permissions:
⑥、Start MySQL:
⑦、Log in to the MySQL server via the command line (press Enter when prompted for a password):
⑧、Enter the following SQL statements to create a user with root privileges (admin) and password (12345678):
GRANT ALL PRIVILEGES ON *.* TO 'admin'@'127.0.0.1' IDENTIFIED BY '12345678';
⑨、(Optional) Stop MySQL:
3、Compile and Install PHP (FastCGI Mode)
gzip -cd php-5.2.14-fpm-0.5.14.diff.gz | patch -d php-5.2.14 -p1
cd php-5.2.14/
./configure –prefix=/usr/local/webserver/php –with-config-file-path=/usr/local/webserver/php/etc –with-mysql=/usr/local/webserver/mysql –with-mysqli=/usr/local/webserver/mysql/bin/mysql_config –with-iconv-dir=/usr/local –with-freetype-dir –with-jpeg-dir –with-png-dir –with-zlib –with-libxml-dir=/usr –enable-xml –disable-rpath –enable-discard-path –enable-safe-mode –enable-bcmath –enable-shmop –enable-sysvsem –enable-inline-optimization –with-curl –with-curlwrappers –enable-mbregex –enable-fastcgi –enable-fpm –enable-force-cgi-redirect –enable-mbstring –with-mcrypt –with-gd –enable-gd-native-ttf –with-openssl –with-mhash –enable-pcntl –enable-sockets –with-ldap –with-ldap-sasl –with-xmlrpc –enable-zip –enable-soap
make ZEND_EXTRA_LIBS='-liconv'
make install
cp php.ini-dist /usr/local/webserver/php/etc/php.ini
cd ../
4、Compile and Install PHP5 Extension Modules
cd memcache-2.2.5/
/usr/local/webserver/php/bin/phpize
./configure –with-php-config=/usr/local/webserver/php/bin/php-config
make
make install
cd ../
tar jxvf eaccelerator-0.9.6.1.tar.bz2
cd eaccelerator-0.9.6.1/
/usr/local/webserver/php/bin/phpize
./configure –enable-eaccelerator=shared –with-php-config=/usr/local/webserver/php/bin/php-config
make
make install
cd ../
tar zxvf PDO_MYSQL-1.0.2.tgz
cd PDO_MYSQL-1.0.2/
/usr/local/webserver/php/bin/phpize
./configure –with-php-config=/usr/local/webserver/php/bin/php-config –with-pdo-mysql=/usr/local/webserver/mysql
make
make install
cd ../
tar zxvf ImageMagick.tar.gz
cd ImageMagick-6.5.1-2/
./configure
make
make install
cd ../
tar zxvf imagick-2.3.0.tgz
cd imagick-2.3.0/
/usr/local/webserver/php/bin/phpize
./configure –with-php-config=/usr/local/webserver/php/bin/php-config
make
make install
cd ../
5、Modify the php.ini File
Manual Modification: Find extension_dir = "./" in /usr/local/webserver/php/etc/php.ini
Change it to extension_dir = "/usr/local/webserver/php/lib/php/extensions/no-debug-non-zts-20060613/"
Add the following lines after this line, then save:
extension = "memcache.so"
extension = "pdo_mysql.so"
extension = "imagick.so"
Next, find output_buffering = Off
Change it to output_buffering = On
Then find ; cgi.fix_pathinfo=0
Change it to cgi.fix_pathinfo=0,Prevent Nginx File Type Mismatch Parsing Vulnerability.
Automated Modification: If you find manual editing tedious, you can run the following shell commands to automatically complete the modification of the php.ini file:
sed -i 's#output_buffering = Off#output_buffering = On#' /usr/local/webserver/php/etc/php.ini
sed -i "s#; always_populate_raw_post_data = On#always_populate_raw_post_data = On#g" /usr/local/webserver/php/etc/php.ini
sed -i "s#; cgi.fix_pathinfo=0#cgi.fix_pathinfo=0#g" /usr/local/webserver/php/etc/php.ini
6. Configure eAccelerator to Accelerate PHP:
vi /usr/local/webserver/php/etc/php.ini
Press shift+g to jump to the very end of the configuration file, then add the following configuration information:
zend_extension="/usr/local/webserver/php/lib/php/extensions/no-debug-non-zts-20060613/eaccelerator.so"
eaccelerator.shm_size="64"
eaccelerator.cache_dir="/usr/local/webserver/eaccelerator_cache"
eaccelerator.enable="1"
eaccelerator.optimizer="1"
eaccelerator.check_mtime="1"
eaccelerator.debug="0"
eaccelerator.filter=""
eaccelerator.shm_max="0"
eaccelerator.shm_ttl="3600"
eaccelerator.shm_prune_period="3600"
eaccelerator.shm_only="0"
eaccelerator.compress="1"
eaccelerator.compress_level="9"
7. Create the www User and Group, and Directories for the Two Virtual Hosts blog.s135.com and www.s135.com:
/usr/sbin/useradd -g www www
mkdir -p /data0/htdocs/blog
chmod +w /data0/htdocs/blog
chown -R www:www /data0/htdocs/blog
mkdir -p /data0/htdocs/www
chmod +w /data0/htdocs/www
chown -R www:www /data0/htdocs/www
8. Create the php-fpm Configuration File (php-fpm is a FastCGI management patch for PHP that allows for smooth changes to php.ini configuration without restarting php-cgi):
Create the php-fpm.conf file in the /usr/local/webserver/php/etc/ directory:
vi /usr/local/webserver/php/etc/php-fpm.conf
Enter the following content (if you are installing Nginx + PHP for program debugging, please change
<configuration>
All relative paths in this config are relative to php's install prefix
<section name="global_options">
Pid file
<value name="pid_file">/usr/local/webserver/php/logs/php-fpm.pid</value>
Error log file
<value name="error_log">/usr/local/webserver/php/logs/php-fpm.log</value>
Log level
<value name="log_level">notice</value>
When this amount of php processes exited with SIGSEGV or SIGBUS …
<value name="emergency_restart_threshold">10</value>
… in a less than this interval of time, a graceful restart will be initiated.
Useful to work around accidental curruptions in accelerator's shared memory.
<value name="emergency_restart_interval">1m</value>
Time limit on waiting child's reaction on signals from master
<value name="process_control_timeout">5s</value>
Set to 'no' to debug fpm
<value name="daemonize">yes</value>
</section>
<workers>
<section name="pool">
Name of pool. Used in logs and stats.
<value name="name">default</value>
Address to accept fastcgi requests on.
Valid syntax is 'ip.ad.re.ss:port' or just 'port' or '/path/to/unix/socket'
<value name="listen_address">127.0.0.1:9000</value>
<value name="listen_options">
Set listen(2) backlog
<value name="backlog">-1</value>
Set permissions for unix socket, if one used.
In Linux read/write permissions must be set in order to allow connections from web server.
Many BSD-derrived systems allow connections regardless of permissions.
<value name="owner"></value>
<value name="group"></value>
<value name="mode">0666</value>
</value>
Additional php.ini defines, specific to this pool of workers.
<value name="php_defines">
<value name="sendmail_path">/usr/sbin/sendmail -t -i</value>
<value name="display_errors">0</value>
</value>
Unix user of processes
<value name="user">www</value>
Unix group of processes
<value name="group">www</value>
Process manager settings
<value name="pm">
Sets style of controling worker process count.
Valid values are 'static' and 'apache-like'
<value name="style">static</value>
Sets the limit on the number of simultaneous requests that will be served.
Equivalent to Apache MaxClients directive.
Equivalent to PHP_FCGI_CHILDREN environment in original php.fcgi
Used with any pm_style.
<value name="max_children">128</value>
Settings group for 'apache-like' pm style
<value name="apache_like">
Sets the number of server processes created on startup.
Used only when 'apache-like' pm_style is selected
<value name="StartServers">20</value>
Sets the desired minimum number of idle server processes.
Used only when 'apache-like' pm_style is selected
<value name="MinSpareServers">5</value>
Sets the desired maximum number of idle server processes.
Used only when 'apache-like' pm_style is selected
<value name="MaxSpareServers">35</value>
</value>
</value>
The timeout (in seconds) for serving a single request after which the worker process will be terminated
Should be used when 'max_execution_time' ini option does not stop script execution for some reason
'0s' means 'off'
<value name="request_terminate_timeout">0s</value>
The timeout (in seconds) for serving of single request after which a php backtrace will be dumped to slow.log file
'0s' means 'off'
<value name="request_slowlog_timeout">0s</value>
The log file for slow requests
<value name="slowlog">logs/slow.log</value>
Set open file desc rlimit
<value name="rlimit_files">65535</value>
Set max core size rlimit
<value name="rlimit_core">0</value>
Chroot to this directory at the start, absolute path
<value name="chroot"></value>
Chdir to this directory at the start, absolute path
<value name="chdir"></value>
Redirect workers' stdout and stderr into main error log.
If not set, they will be redirected to /dev/null, according to FastCGI specs
<value name="catch_workers_output">yes</value>
How much requests each process should execute before respawn.
Useful to work around memory leaks in 3rd party libraries.
For endless request processing please specify 0
Equivalent to PHP_FCGI_MAX_REQUESTS
<value name="max_requests">1024</value>
Comma separated list of ipv4 addresses of FastCGI clients that allowed to connect.
Equivalent to FCGI_WEB_SERVER_ADDRS environment in original php.fcgi (5.2.2+)
Makes sense only with AF_INET listening socket.
<value name="allowed_clients">127.0.0.1</value>
Pass environment variables like LD_LIBRARY_PATH
All $VARIABLEs are taken from current environment
<value name="environment">
<value name="HOSTNAME">$HOSTNAME</value>
<value name="PATH">/usr/local/bin:/usr/bin:/bin</value>
<value name="TMP">/tmp</value>
<value name="TMPDIR">/tmp</value>
<value name="TEMP">/tmp</value>
<value name="OSTYPE">$OSTYPE</value>
<value name="MACHTYPE">$MACHTYPE</value>
<value name="MALLOC_CHECK_">2</value>
</value>
</section>
</workers>
</configuration>
9、Start the php-cgi process, listening on port 9000 of 127.0.0.1, with 128 processes (if the server memory is less than 3GB, you can start only 64 processes), user www:
/usr/local/webserver/php/sbin/php-fpm start
Note: /usr/local/webserver/php/sbin/php-fpm has other parameters, including: start|stop|quit|restart|reload|logrotate. After modifying php.ini, you don’t need to restart php-cgi; use reload to reload the configuration file.
3. Install Nginx 0.8.46
1. Install the pcre library required by Nginx:
cd pcre-8.10/
./configure
make && make install
cd ../
2. Install Nginx
cd nginx-0.8.46/
./configure –user=www –group=www –prefix=/usr/local/webserver/nginx –with-http_stub_status_module –with-http_ssl_module
make && make install
cd ../
3. Create Nginx Log Directory
chmod +w /data1/logs
chown -R www:www /data1/logs
4. Create Nginx Configuration File
①. Create the nginx.conf file in the /usr/local/webserver/nginx/conf/ directory:
vi /usr/local/webserver/nginx/conf/nginx.conf
Enter the following content:
worker_processes 8;
error_log /data1/logs/nginx_error.log crit;
pid /usr/local/webserver/nginx/nginx.pid;
#Specifies the value for maximum file descriptors that can be opened by this process.
worker_rlimit_nofile 65535;
events
{
use epoll;
worker_connections 65535;
}
http
{
include mime.types;
default_type application/octet-stream;
#charset gb2312;
server_names_hash_bucket_size 128;
client_header_buffer_size 32k;
large_client_header_buffers 4 32k;
client_max_body_size 8m;
sendfile on;
tcp_nopush on;
keepalive_timeout 60;
tcp_nodelay on;
fastcgi_connect_timeout 300;
fastcgi_send_timeout 300;
fastcgi_read_timeout 300;
fastcgi_buffer_size 64k;
fastcgi_buffers 4 64k;
fastcgi_busy_buffers_size 128k;
fastcgi_temp_file_write_size 128k;
gzip on;
gzip_min_length 1k;
gzip_buffers 4 16k;
gzip_http_version 1.0;
gzip_comp_level 2;
gzip_types text/plain application/x-javascript text/css application/xml;
gzip_vary on;
#limit_zone crawler $binary_remote_addr 10m;
server
{
listen 80;
server_name blog.s135.com;
index index.html index.htm index.php;
root /data0/htdocs/blog;
#limit_conn crawler 20;
location ~ .*/.(php|php5)?$
{
#fastcgi_pass unix:/tmp/php-cgi.sock;
fastcgi_pass 127.0.0.1:9000;
fastcgi_index index.php;
include fcgi.conf;
}
location ~ .*/.(gif|jpg|jpeg|png|bmp|swf)$
{
expires 30d;
}
location ~ .*/.(js|css)?$
{
expires 1h;
}
log_format access '$remote_addr – $remote_user [$time_local] "$request" '
'$status $body_bytes_sent "$http_referer" '
'"$http_user_agent" $http_x_forwarded_for';
access_log /data1/logs/access.log access;
}
server
{
listen 80;
server_name www.s135.com;
index index.html index.htm index.php;
root /data0/htdocs/www;
location ~ .*/.(php|php5)?$
{
#fastcgi_pass unix:/tmp/php-cgi.sock;
fastcgi_pass 127.0.0.1:9000;
fastcgi_index index.php;
include fcgi.conf;
}
log_format wwwlogs '$remote_addr – $remote_user [$time_local] "$request" '
'$status $body_bytes_sent "$http_referer" '
'"$http_user_agent" $http_x_forwarded_for';
access_log /data1/logs/wwwlogs.log wwwlogs;
}
server
{
listen 80;
server_name status.blog.s135.com;
location / {
stub_status on;
access_log off;
}
}
}
②、Create the fcgi.conf file in the /usr/local/webserver/nginx/conf/ directory:
Enter the following content:
fastcgi_param SERVER_SOFTWARE nginx;
fastcgi_param QUERY_STRING $query_string;
fastcgi_param REQUEST_METHOD $request_method;
fastcgi_param CONTENT_TYPE $content_type;
fastcgi_param CONTENT_LENGTH $content_length;
fastcgi_param SCRIPT_FILENAME $document_root$fastcgi_script_name;
fastcgi_param SCRIPT_NAME $fastcgi_script_name;
fastcgi_param REQUEST_URI $request_uri;
fastcgi_param DOCUMENT_URI $document_uri;
fastcgi_param DOCUMENT_ROOT $document_root;
fastcgi_param SERVER_PROTOCOL $server_protocol;
fastcgi_param REMOTE_ADDR $remote_addr;
fastcgi_param REMOTE_PORT $remote_port;
fastcgi_param SERVER_ADDR $server_addr;
fastcgi_param SERVER_PORT $server_port;
fastcgi_param SERVER_NAME $server_name;
# PHP only, required if PHP was built with –enable-force-cgi-redirect
fastcgi_param REDIRECT_STATUS 200;
5、Start Nginx
/usr/local/webserver/nginx/sbin/nginx
IV. Configure Nginx + PHP to Start Automatically on Boot
Add the following content at the end:
/usr/local/webserver/php/sbin/php-fpm start
/usr/local/webserver/nginx/sbin/nginx
V. Optimize Linux Kernel Parameters
Add the following content at the end:
net.ipv4.tcp_max_syn_backlog = 65536
net.core.netdev_max_backlog = 32768
net.core.somaxconn = 32768
net.core.wmem_default = 8388608
net.core.rmem_default = 8388608
net.core.rmem_max = 16777216
net.core.wmem_max = 16777216
net.ipv4.tcp_timestamps = 0
net.ipv4.tcp_synack_retries = 2
net.ipv4.tcp_syn_retries = 2
net.ipv4.tcp_tw_recycle = 1
#net.ipv4.tcp_tw_len = 1
net.ipv4.tcp_tw_reuse = 1
net.ipv4.tcp_mem = 94500000 915000000 927000000
net.ipv4.tcp_max_orphans = 3276800
#net.ipv4.tcp_fin_timeout = 30
#net.ipv4.tcp_keepalive_time = 120
net.ipv4.ip_local_port_range = 1024 65535
Apply the configuration immediately:
VI. Smoothly Change Nginx Configuration Without Stopping the Service
1、After modifying the /usr/local/webserver/nginx/conf/nginx.conf configuration file, run the following command to check if the configuration file is correct:
If the screen displays the following two lines, it indicates the configuration file is correct:
the configuration file /usr/local/webserver/nginx/conf/nginx.conf syntax is ok
the configuration file /usr/local/webserver/nginx/conf/nginx.conf was tested successfully
2、Graceful restart:
①、For Nginx version 0.8.x, smoothly restarting the Nginx configuration is very simple now; just execute the following command:
②、For Nginx versions prior to 0.8.x, a graceful restart is slightly more involved. Follow the steps below. Enter the following command to check the Nginx master process ID:
The screen will display the Nginx master process ID, for example:
6302
At this point, execute the following command to apply the modified Nginx configuration file:
Or you can skip the hassle and locate the Nginx Pid file:
VII. Writing a Daily Scheduled Script to Rotate Nginx Logs
1. Create the script /usr/local/webserver/nginx/sbin/cut_nginx_log.sh
Enter the following content:
# This script run at 00:00
# The Nginx logs path
logs_path="/usr/local/webserver/nginx/logs/"
mkdir -p ${logs_path}$(date -d "yesterday" +"%Y")/$(date -d "yesterday" +"%m")/
mv ${logs_path}access.log ${logs_path}$(date -d "yesterday" +"%Y")/$(date -d "yesterday" +"%m")/access_$(date -d "yesterday" +"%Y%m%d").log
kill -USR1 `cat /usr/local/webserver/nginx/nginx.pid`
2. Set up crontab to rotate the Nginx access log daily at 00:00
Enter the following content:
Any minor updates to this article will be published first at the following URL:
http://blog.s135.com/nginx_php_v6/