

<<
In many cases, because we have compiled Nginx ourselves, the official Nginx automatic module may fail to install or encounter errors. Below we will reinstall the Nginx module to better protect our website:
Note: For the latest v3 version, please go to https://www.cnop.net/html/news/security/2020/0328/5124.html
1. Yunsuo Linux Edition, installation method as follows:
Yunsuo Linux Edition 32-bit Download Tutorial
Download Yunsuo Linux Edition 32-bit
wget http://download.yunsuo.com.cn/yunsuo_agent_32bit.tar.gz
Extract the file to get the installation package:
tar zxvf yunsuo_agent_32bit.tar.gz
Give the Yunsuo installation package executable permission:
chmod +x yunsuo_agent_32bit.bin
Run the installation file until you see the prompt “Install Success.” indicating installation is complete
./yunsuo_agent_32bit.bin
Yunsuo Linux Edition 64-bit Download Tutorial
Yunsuo Linux Edition Installation
wget http://download.yunsuo.com.cn/yunsuo_agent_64bit.tar.gz
Extract the file to get the installation package:
tar zxvf yunsuo_agent_64bit.tar.gz
Give the Yunsuo installation package executable permission:
chmod +x yunsuo_agent_64bit.bin
Run the installation file until you see the prompt “Install Success.” indicating installation is complete
./yunsuo_agent_64bit.bin
Check if Yunsuo is running
ps -ef | grep yunsuo_agent
Uninstall Yunsuo
/usr/local/yunsuo_agent/uninstall
2. Nginx Module Installation:
This installation method applies to situations where Nginx was previously installed but the Yunsuo module was not installed.
You can check what modules were loaded in the previously installed Nginx, as these need to be compiled in again this time:
# nginx -V
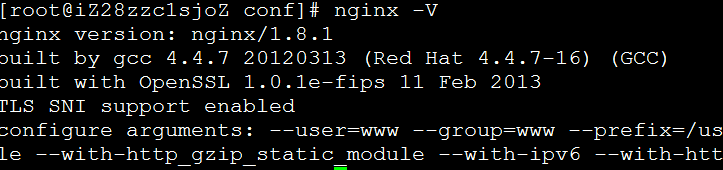
Above are the modules and Nginx version installed during my previous Nginx compilation.
How to compile the Yunsuo Nginx module, steps are as follows:
1. To avoid unexpected situations, please first back up the Nginx currently in use on the system (including related website configuration files, using my /usr/local/nginx installation path as an example):
cp -R /usr/local/nginx/ /usr/local/nginx.bak
or
cp /usr/local/nginx/sbin/nginx /usr/local/nginx/sbin/nginx.bak

2. Download the plugin module:
wget https://codeload.github.com/yunsuo-open/nginx-plugin/zip/master -O nginx-plugin-master.zip
3. Extract:
unzip nginx-plugin-master.zip
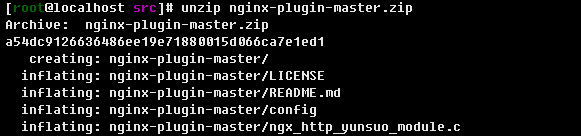
4. cd nginx-plugin-master
5. Run pwd to get the full path of the current Yunsuo plugin source directory (assuming it is: /home/nginx-plugin-master, the actual path depends on the pwd output)

6. Download the corresponding version of Nginx source code. If your environment uses Tengine, you can skip this step. For the Nginx version, since it does not support POST filtering, you need to modify the src/http/ngx_http_upstream.c file in the Nginx source directory. Steps are as follows:
Extract the relevant source code:
a. Around line 502, find the function static void ngx_http_upstream_init_request(ngx_http_request_t *r), and add the following line above it: int ngx_http_yunsuo_post_in_handler(ngx_http_request_t *r);
b. At the beginning of the ngx_http_upstream_init_request function, after the variable declarations, add:
if(ngx_http_yunsuo_post_in_handler(r))
{
return;
}
Source code before modification:
static void
ngx_http_upstream_init_request(ngx_http_request_t *r)
{
ngx_str_t *host;
ngx_uint_t i;
ngx_resolver_ctx_t *ctx, temp;
ngx_http_cleanup_t *cln;
ngx_http_upstream_t *u;
ngx_http_core_loc_conf_t *clcf;
ngx_http_upstream_srv_conf_t *uscf, **uscfp;
ngx_http_upstream_main_conf_t *umcf;
if (r->aio) {
return;
}
u = r->upstream;
……
}
Source code after modification:
/*This section is added*/
int ngx_http_yunsuo_post_in_handler(ngx_http_request_t *r);
/*————*/
static void
ngx_http_upstream_init_request(ngx_http_request_t *r)
{
ngx_str_t *host;
ngx_uint_t i;
ngx_resolver_ctx_t *ctx, temp;
ngx_http_cleanup_t *cln;
ngx_http_upstream_t *u;
ngx_http_core_loc_conf_t *clcf;
ngx_http_upstream_srv_conf_t *uscf, **uscfp;
ngx_http_upstream_main_conf_t *umcf;
if (r->aio) {
return;
}
u = r->upstream;
……
}
Source code after modification:
/*This section is added*/
int ngx_http_yunsuo_post_in_handler(ngx_http_request_t *r);
/*————*/
static void
ngx_http_upstream_init_request(ngx_http_request_t *r)
{
ngx_str_t *host;
ngsp; i;
ngx_resolver_ctx_t *ctx, temp;
ngx_http_cleanup_t *cln;
ngx_http_upstream_t *u;
ngx_http_core_loc_conf_t *clcf;
ngx_http_upstream_srv_conf_t *uscf, **uscfp;
ngx_http_upstream_main_conf_t *umcf;
/* This section is added */
if(ngx_http_yunsuo_post_in_handler(r))
{
return;
}
/*————*/
if (r->aio) {
return;
}
u = r->upstream;
……
}
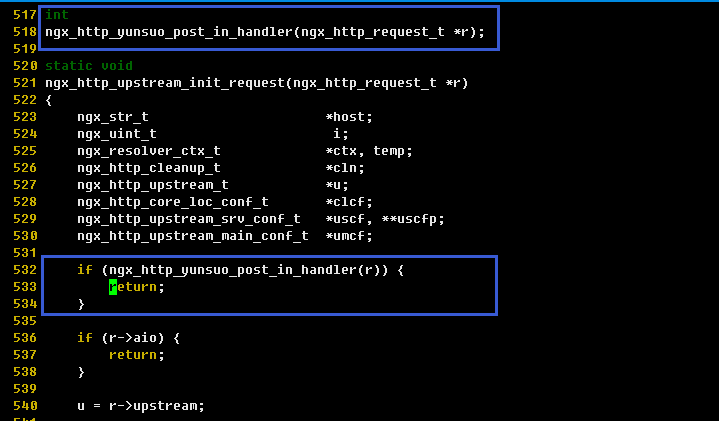
7. The Yunsuo nginx plugin module is a standard nginx module. Therefore, during the nginx compilation process, you only need to add the extra parameter –add-module=/home/nginx-plugin-master (Note: /home/nginx-plugin-master is an example; use the actual path obtained from the pwd command in step 5) to enable nginx to support Yunsuo’s functionality.
Example: Assuming your previous configure command was: ./configure –prefix=/usr/local/nginx –with-http_stub_status_module / –with-http_ssl_module –with-http_gzip_static_module / –add-module=../ngx_cache_purge-1.3 The current configure command would be: ./configure –prefix=/usr/local/nginx –with-http_stub_status_module / –with-http_ssl_module –with-http_gzip_static_module / –add-module=../ngx_cache_purge-1.3 –add-module=/home/nginx-plugin-master

8. Compile nginx (Note: If nginx already exists, only execute make. Do not use make install, as it will overwrite your nginx.conf)
Replace the currently active nginx binary with the newly compiled nginx file containing the Yunsuo module, then restart nginx for the new compilation to take effect.
rm -rf/usr/local/nginx/sbin/nginx
cp objs/nginx /usr/local/nginx/sbin/

To let Yunsuo recognize your self-compiled nginx, follow these steps:
1. Install Yunsuo. If you have already installed it, skip this step. If not, please go to http://www.yunsuo.com.cn/ht/software/ to download and install Yunsuo.
2. cd /usr/local/yunsuo_agent/nginx/
3. ./configure_compile_nginx nginx_install_path (nginx_install_path is the installation path of nginx, i.e., the –prefix=path specified during configure. If no path was specified, it defaults to /usr/local/nginx)
4. Restart nginx

For the local management client download, please go to:
http://www.yunsuo.com.cn/ht/software/
FAQ
1. When do I need to compile the Yunsuo nginx module myself?
① You need to compile the Yunsuo nginx module when your nginx uses third-party or self-developed modules. You can check if the output of the nginx -V command contains –add-module= (e.g., –add-module=../ngx_cache_purge-1.3 indicates the use of the ngx_cache_purge-1.3 third-party module).
② You need to compile the Yunsuo nginx module when using Tengine. c. When you find that the currently used nginx version is higher than the version we automatically installed, you can compile the Yunsuo nginx module yourself.
2. If I uninstall Yunsuo, do I need to recompile Nginx?
No, you don’t. Yunsuo’s Nginx module will detect whether Yunsuo is installed; if it isn’t, the module simply won’t activate. Of course, you can also replace it with the original Nginx binary if you prefer.
3. Should I install Yunsuo first or compile Nginx first?
Either way is fine; there’s no required order.
4. How to Uninstall the Nginx Plugin Separately
There are three methods to uninstall the plugin:
① By default, the current version of Nginx does not support uninstallation from the client. To enable client-side uninstallation, you need to manually rename the system’s original Nginx to nginx.bak, and use it to replace the nginx.bak in the /usr/local/yunsuo_agent/nginx/backup directory (this operation requires disabling Yunsuo’s self-protection feature). After that, you can use the client’s plugin uninstall function.
② Manually delete or rename the libnginx_plugin.so file in the /usr/local/yunsuo_agent/nginx/ directory (this operation requires disabling Yunsuo’s self-protection feature), then restart the Nginx service.
③ Manually replace the currently used Nginx (which has the Yunsuo plugin) directly with the system’s original Nginx binary.
The first method is recommended, as it makes future installations and uninstallations easier.
5. Solutions for Possible Compilation Errors
① If you encounter the error: cc1: all warnings being treated as errors, it means the compiler is treating warnings as errors.
Solution: Modify objs/Makefile
Change CFLAGS = -pipe -O -W -Wall -Wpointer-arith -Wno-unused-parameter -Werror -g to: CFLAGS = -pipe -O -W -Wall -Wpointer-arith -Wno-unused-parameter -g (i.e., remove the -Werror option).
Then run make again. Note: it’s re-running make, not re-running ./configure.
② If you encounter the error: undefined reference to `dlclose', it’s because the compiler version is too high and the -ldl option needs to be added during linking.
Fix: Edit the objs/Makefile
Search for -lpthread, go to the end of that line, and add -ldl
For example, change -lpthread -lcrypt to -lpthread -lcrypt -ldl
Run make again. Note that you should run make again, not ./configure again.
Alright, that’s all for now. We’ll see you on GitHub. Click “Read More” to join the fight.