

1. Installing the LVS Software
1. Pre-Installation Preparation
Operating System: Uniformly use CentOS 4.4.
Address Planning, as shown in Table 1:
Table 1
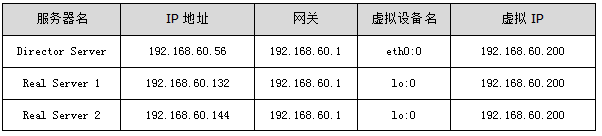
More detailed information is shown in Figure 2:
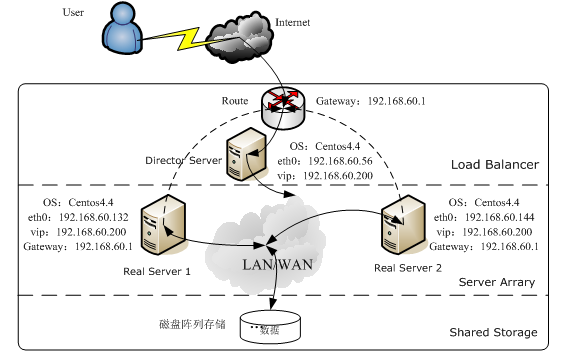
Figure 2: LVS DR Mode Installation and Deployment Architecture Diagram
In Figure 2, VIP refers to the Virtual IP Address, also known as the LVS cluster’s service IP. In DR and TUN modes, data packets are returned directly to the user, so this address must be configured on both the Director Server and every node in the cluster. On Real Servers, this IP is typically bound to the loopback interface, e.g., lo:0. Similarly, on the Director Server, the virtual IP is bound to a physical network interface, e.g., eth0:0.
The Real Servers can be within the same network segment, in separate independent segments, or even distributed across multiple servers on the internet.
2. Installing the Operating System
CentOS 4.4’s Linux kernel supports LVS functionality by default. To facilitate the compilation and installation of the IPVS management software, it is recommended to select the following package groups during the OS installation:
飦?nbsp;Desktop Environments: X Window System, GNOME Desktop Environment.
飦?nbsp;Development Tools: Development Tools, X Software Development, GNOME Software Development, KDE Software Development.
After the system installation is complete, you can check whether the kernel already supports the LVS IPVS module using the following command:
[root@localhost ~]#modprobe -l |grep ipvs
/lib/modules/2.6.9-42.ELsmp/kernel/net/ipv4/ipvs/ip_vs_rr.ko
/lib/modules/2.6.9-42.ELsmp/kernel/net/ipv4/ipvs/ip_vs_sh.ko
If you see output similar to the above, it indicates that the system kernel has default support for the IPVS module. You can then proceed to install the IPVS management software.
3. Installing IPVS Management Software on the Director Server
IPVS provides software packages in both source code and RPM formats. Here, we introduce installing IPVS from source. First, download the corresponding version of the ipvs source code from http://www.linuxvirtualserver.org/software/ipvs.html. Since we are using CentOS 4.4, download the corresponding ipvsadm-1.24 version, then proceed with the installation:
[root@localhost ~]#tar zxvf ipvsadm-1.24.tar.gz
[root@localhost ~]#cd ipvsadm-1.24
[root@localhost ~]#make
[root@localhost ~]#make install
Note: During the make process, you might encounter compilation errors. This usually happens because the build program cannot find the corresponding kernel source. You can compile normally by doing the following:
[root@localhost ~]#ln -s /usr/src/kernels/2.6.9-42.EL-i686/ /usr/src/linux
You can also download an RPM package and install it using the RPM method:
[root@localhost ~]#rpm –ivh ipvsadm-1.24-6.1.i386.rpm
Then execute:
[root@localhost ~]# ipvsadm –help
If you see the help prompt, IPVS has been successfully installed.
4. Usage of ipvsadm
锛?锛塁ommon syntax and format of ipvsadm:
ipvsadm -A|E -t|u|f virutal-service-address:port [-s scheduler] [-p [timeout]] [-M netmask]
ipvsadm -D -t|u|f virtual-service-address
ipvsadm -C
ipvsadm -R
ipvsadm -S [-n]
ipvsadm -a|e -t|u|f virtual-service-address:port -r real-server-address:port
[-g|i|m] [-w weight]
ipvsadm -d -t|u|f virtual-service-address -r real-server-address
ipvsadm -L|l [options]
ipvsadm -Z [-t|u|f virtual-service-address]
ipvsadm –set tcp tcpfin udp
ipvsadm –h
Where:
飦?nbsp;virtual-service-address: Refers to the virtual server’s IP address, which is 192.168.60.200 in this document.
飦?nbsp;real-service-address: Refers to the Real Server’s IP address, which are 192.168.60.132/144 in this document.
飦?nbsp;scheduler: Specifies the scheduling algorithm.
The detailed meanings of ipvsadm command options are shown in Table 2:
Table 2
Command Option
Meaning
-A (–add-service) Adds a new virtual IP record to the kernel’s virtual server list. This adds a new virtual server. The virtual IP is the virtual server’s IP address.
-E (–edit-service) Edits a virtual server record in the kernel’s virtual server list.
-D (–delete-service) Deletes a virtual server record from the kernel’s virtual server list.
-C (–clear) Clears all records in the kernel’s virtual server list.
-R (–restore) Restores virtual server rules.
-S (–save) Saves virtual server rules, outputting in a format readable by the -R option.
-a (–add-server) Adds a new Real Server record to an entry in the kernel’s virtual server list. This adds a new Real Server to a virtual server.
-e (–edit-server) Edits a specific Real Server record within a virtual server entry.
-d (–delete-server) Deletes a specific Real Server record from a virtual server entry.
-L|-l –list Displays the virtual server list in the kernel.
-Z (–zero) Zeros the counters for all virtual servers in the list (clears current connection counts, etc.).
–set tcp tcpfin udp Sets connection timeout values.
-t Indicates that the virtual server provides a TCP service. This option is followed by the format:
[virtual-service-address:port] or [real-server-ip:port]
-u Indicates that the virtual server provides a UDP service. This option is followed by the format:
[virtual-service-address:port] or [real-server-ip:port]
-f fwmark Indicates a service type marked by iptables firewall marks.
-s This option is followed by the scheduling algorithm used by LVS.
Available options are: rr|wrr|lc|wlc|lblc|lblcr|dh|sh
The default scheduling algorithm is: wlc
-p [timeout] Persistence time on a specific Real Server. This means multiple requests from the same user will be handled by the same Real Server. This parameter is generally used for operations involving dynamic requests. The default timeout is 300 seconds. For example: -p 600 means a persistence time of 600 seconds.
-r Specifies the IP address of the Real Server. This option is followed by the format:
[real-server-ip:port]
-g (–gatewaying) Specifies that the LVS working mode is Direct Routing (this is the default LVS working mode).
-i (-ipip) Specifies that the LVS working mode is Tunneling mode.
-m (–masquerading) Specifies that the LVS working mode is NAT mode.
-w (–weight) weight Specifies the weight value for the Real Server.
-c (–connection) Displays current LVS connection information, e.g., ipvsadm -L -c
-L –timeout Displays the timeout values for “tcp tcpfin udp”, e.g., ipvsadm -L –timeout
-L –daemon Displays the synchronization daemon state, e.g., ipvsadm -L –daemon
-L –stats Displays statistical information, e.g., ipvsadm -L –stats
-L –rate Displays rate information, e.g., ipvsadm -L –rate
-L –sort Sorts the output of virtual servers and real servers, e.g., ipvsadm -L –sort
Note:
In Table 2, the content in parentheses represents the long format form for each ipvsadm option. Linux command options have both long and short formats. Short format options are more commonly used. In practice, you can use the long format in parentheses as an alternative to the short format. For example, you can use “ipvsadm –clear” instead of “ipvsadm -C”.
锛?锛塃xamples
[root@localhost ~]# ipvsadm -A -t 192.168.60.200:80 -s rr -p 600
The above command adds a virtual server record for 192.168.60.200 to the kernel’s virtual server list, specifies the service port for this virtual server as 80, designates the scheduling policy as Round Robin, and sets the persistence time on each real server to 600 seconds (10 minutes).
[root@localhost ~]# ipvsadm -A -t 192.168.60.188:21 -s wlc
The above command adds another virtual server, 192.168.60.188, to the kernel’s virtual server list. The service port for this virtual server is 21 (FTP service), and the scheduling policy used is Weighted Least-Connection (wlc).
[root@localhost ~]# ipvsadm -a -t 192.168.60.200:80 -r 192.168.60.132:80 –g
[root@localhost ~]# ipvsadm -a -t 192.168.60.200:80 -r 192.168.60.144:80 –g
The above two commands add two new Real Server records to the virtual server 192.168.60.200. The IPs of the two Real Servers are 192.168.60.