

client:192.168.20.214
Actually, three machines are enough. MooseFS does not strictly require that the master, chunkserver, and client cannot run on the same machine, and I have indeed tried this without any issues. However, considering system security and stability, it is recommended to run the master on a separate machine with proper backups. The chunkserver and client placements can be decided based on specific needs.
1. Environment Setup (All machines must do this):
Install common libraries
yum -y install gcc zlib-devel zlib fuse fuse-devel fuse-libs ntp
wget http://mirror.cnop.net/moosefs/moosefs-2.0.81-1.tar.gz
or
wget http://mirror2.cnop.net/moosefs/moosefs-2.0.81-1.tar.gztar -zxvf moosefs-2.0.81-1.tar.gzcd moosefs-2.0.81
useradd mfs -s /sbin/nologin
./configure –prefix=/usr/local/mfs –with-default-user=mfs –with-default-group=mfs
make && make install
2. Master Configuration
After the first step, enter the relevant directory:
cd /usr/local/mfs/etc/mfs
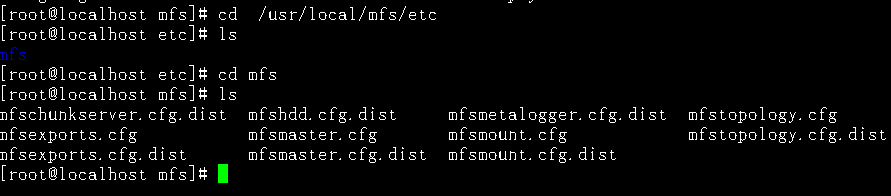
The file we need is mfsmaster.cfg under etc, and the tool is mfsmaster under sbin. Let’s look at mfsmaster.cfg first.
cp mfsmaster.cfg.dist mfsmaster.cfg
vi mfsmaster.cfg
# MATOCS_LISTEN_HOST = * Change to MATOCS_LISTEN_HOST = 192.168.20.210
Start the master
cd /usr/local/mfs/var/mfs
cp metadata.mfs.empty metadata.mfscd /usr/local/mfs/etc/mfscp mfsexports.cfg.dist mfsexports.cfgcp mfstopology.cfg.dist mfstopology.cfg/usr/local/mfs/sbin/mfsmaster

After that, you can check the system log to see the master’s running status.
/usr/local/mfs/sbin/mfsmaster stop
Tip: If you find typing such long commands every time annoying, you can add it to your PATH:
export PATH=/usr/local/mfs/sbin:/usr/local/mfs/sbin:$PATH
After that, controlling the master directly with mfsmaster or mfsmaster -s is much more convenient, isn’t it?
For startup on boot, we can add the following line to /etc/rc.local (adjust according to your actual situation):
vi /etc/rc.local
/usr/local/mfs/sbin/mfsmaster
/usr/local/mfs/sbin/mfscgiserv
Starting the management interface:
/usr/local/mfs/sbin/mfscgiserv

Browser access:
http://192.168.20.210:9425
You can then access it.
Adding ports to the firewall:
/sbin/iptables -I INPUT -p tcp –dport 9421 -j ACCEPT
/etc/rc.d/init.d/iptables save
/sbin/iptables -I INPUT -p tcp –dport 9419 -j ACCEPT
/etc/rc.d/init.d/iptables save
/sbin/iptables -I INPUT -p tcp –dport 9420 -j ACCEPT
/etc/rc.d/init.d/iptables save
/sbin/iptables -I INPUT -p tcp –dport 9425 -j ACCEPT
/etc/rc.d/init.d/iptables save
service iptables restart
cd /usr/local/mfs/etc/mfs
cp mfschunkserver.cfg.dist mfschunkserver.cfg
vi mfschunkserver.cfg
# MASTER_HOST = mfsmaster change to MASTER_HOST = 192.168.20.210
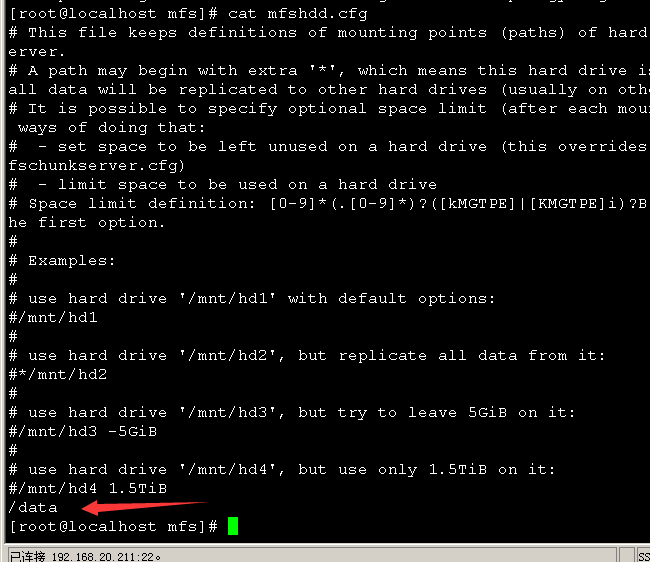
Now let’s look at mfshdd.cfg, which as the name implies is the MFS hard drive configuration:
cd /usr/local/mfs/etc/mfs
cp mfshdd.cfg.dist mfshdd.cfg
Create a directory for storing data and set permissions:
mkdir /data
chown -R mfs.mfs /data
Editmfshdd.cfg
vi mfshdd.cfg
You can ignore the default comments, as they don’t exist on our machine.Here we add one line at the bottom:
/data
This partition is a separate hard drive on my machine specifically used for storing data.
/usr/local/mfs/sbin/mfschunkserver
To start mfschunkserver on boot, add the following:
vi /etc/rc.local
/usr/local/mfs/sbin/mfschunkserver
cd /usr/local/mfs/etc/mfscp mfsmetalogger.cfg.dist mfsmetalogger.cfgvi mfsmetalogger.cfg
/usr/local/mfs/sbin/mfsmetalogger
V. Configuring the Client
Strictly speaking, the client doesn’t require much configuration; it’s essentially just an application. The client can be any server that needs to use the distributed system and has mfsmount installed. For the client, MooseFS differs only in its mount method; once mounted, it is no different from a regular hard drive partition. So how do you mount it?
Here we take the server 192.168.20.213 as an example. We won’t repeat the MooseFS software installation steps here; please refer to the first step. The command to use is mfsmount, which is located in the bin directory.
# mkdir /data
#/usr/local/mfs/bin/mfsmount /data -H 192.168.20.210
Note: if the client mount directory and the storage server are on the same machine, the directories must not be the same. The mfsmount command commonly uses two parameters:-H specifies the server.The last argument specifies the local mount directory.
Mount the other machine, 192.168.20.214, in the same way.
From now on, you can read and write normally to the /data directory on 213. Anything you write will be distributed across multiple other chunkserver machines to ensure data safety.
Add to startup on boot:
vi /etc/rc.local
Add the following information:
/usr/local/mfs/bin/mfsmount /data -H 192.168.20.210
VI. Mounting the Trash Can Directory:
Create the trash can mount directory:
mkdir /home/trash
Mount the trash can:
/usr/local/mfs/bin/mfsmount -o mfsmeta -H 192.168.20.210 /home/trash
The trash directory contains files deleted to the recycle bin. If you move them to the undel subdirectory, the deleted files will be restored to the original MooseFS file system. As shown below, after executing the last line, you can see the file has been restored in the file system:
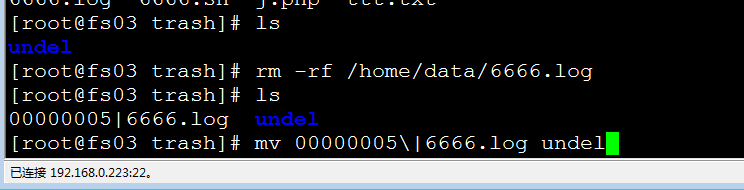
Only the administrator has permission to access MFSMETA (user uid 0, usually root). Inside the MFSMETA directory, besides the trash and trash/undel directories, there is a third directory called reserved. This directory contains files that have been deleted but still have open handles. Once the user closes these opened files, the files in the reserved directory will be deleted, and the file data will be immediately removed. The naming convention for files in the reserved directory is the same as in the trash directory.
Common Commands (Client Operations):
Check the number of file copies:
/usr/local/mfs/bin/mfsgetgoal /data
Check how many copies the /data directory has.
Set the number of file copies:
/usr/local/mfs/bin/mfssetgoal -r 3 /data
Set the directory /data to keep 3 copies.
Set deletion delay:
/usr/local/mfs/bin/mfsrsettrashtime 10 -r /data
Data in the recycle bin will be cleared 10 seconds after deletion.
Check the deletion delay time:
/usr/local/mfs/bin/mfsgettrashtime /data