

Feature: In the product list, click the magnifying glass to display all product attributes and their prices. The effect is as follows:
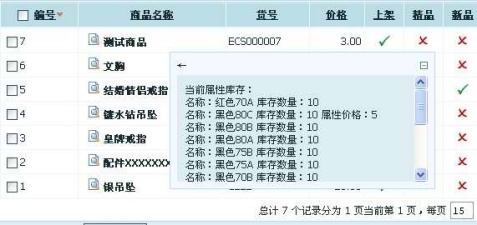
Method/Steps:
1. Edit the /admin/templates/goods_list.htm template, below
<!– Product Search –>
{include file="goods_search.htm"}
add the following code:
<div id="zoomImg" style="position:absolute;display:none;width:200px; height:160px;padding:5px;cursor:hand;border:1px solid
#B4DCFF;z-index:20;background:#F4F9FF"></div>
2. Find
<span onclick="listTable.edit(this, 'edit_goods_name',
{$goods.goods_id})">{$goods.goods_name|escape:html}</span>
Before this line of code (before <span>), insert:
<img src="images/icon_view.gif" title="View attribute list"
border=0 onclick="zoomImg(this,'{$goods.goods_id}')">
3. Scroll to the bottom, before </script>, insert the following JS function:
function zoomImg(obj,sortId){
var layer = document.getElementById("zoomImg");
var t=obj.offsetTop;
var l=obj.offsetLeft;
while(obj=obj.offsetParent){
t+=obj.offsetTop;
l+=obj.offsetLeft;
}
layer.style.left =l+100;
layer.style.top = t-5;
//layer.style.left =200;
//layer.style.top = 120;
zoomHtml="<table><tr><td>←</td><td align=right><a href=# onclick=document.getElementById
('zoomImg').style.display='none'><img src='images/menu_minus.gif' title='Close' border=0></a></td></tr><tr><td height=130
colspan=2><IFRAME frameBorder=0 frameSpacing=0 height=100% marginHeight=0 marginWidth=0 scrolling=yes name=main
src=goods_attr.php?id="+sortId+" width=300></IFRAME>";
zoomTime=setTimeout("showZoomImg()",1000);
}
function hideZoomImg(){
var layer = document.getElementById("zoomImg");
clearTimeout(zoomTime);
layer.style.display='none';
zoomHtml="";
}
function showZoomImg(){
var layer = document.getElementById("zoomImg");
layer.innerHTML=zoomHtml;
layer.style.display='';
}
The template editing above is complete.
4. Save the following code as goods_attr.php file, placed under /admin:
<?php
define('IN_ECS', true);
require(dirname(__FILE__) . '/includes/init.php');
require_once(ROOT_PATH . '/admin/includes/lib_goods.php');
include_once(ROOT_PATH . '/includes/cls_image.php');
if ($_REQUEST['id'])
{
$sql = 'SELECT goods_attr_id,goods_id,attr_value,attr_price FROM ' .$ecs->table('goods_attr').
' WHERE goods_id='.$_REQUEST['id'].' ORDER BY goods_attr_id';
$res = $db->query($sql);
$arr = array();
echo "<link href=styles/general.css rel=stylesheet type=text/css />";
echo "<link href=styles/main.css rel=stylesheet type=text/css />";
echo "Current attribute inventory:<br>";
while ($row = $db->fetchRow($res))
{
if ($row['attr_price']=="" or $row['attr_price']==0)
{
$price="";
}else{
$price="Attribute price: ".$row['attr_price'];
}
echo "Name: ".$row['attr_value']." ".$price."<br>";
}
}
?>
Alright, we’re done!
Additional Notes:
1. The above is for version 2.6.1. For other versions, please test whether it applies. I believe it should work for versions that are not too old.
2. All images referenced in the code above exist under /admin/images in the official release, so no need to find them separately.
3. The inventory quantity shown in the screenshot comes from my “Product Attributes and Inventory Linking” feature. The code above does not involve that feature, so you can follow the steps directly without concern.