

PPTP is a relatively simple way to set up a VPN, but comprehensive documentation is hard to find. This article serves as a detailed guide to setting up a PPTP VPN server and addresses other common issues you may encounter.
1. Install PPTP
Installing PPTP is fairly straightforward. For example, on my CentOS 6.4 x64 system, it only takes two commands:
rpm -i http://poptop.sourceforge.net/yum/stable/rhel6/pptp-release-current.noarch.rpmyum -y install pptpd
For Ubuntu, it’s even simpler:
apt-get install pptpd
2. Configure IP Addresses
The program installation is mostly automatic. Next, we need to do some simple configuration. Edit /etc/pptpd.conf and add the IP address configuration at the end:
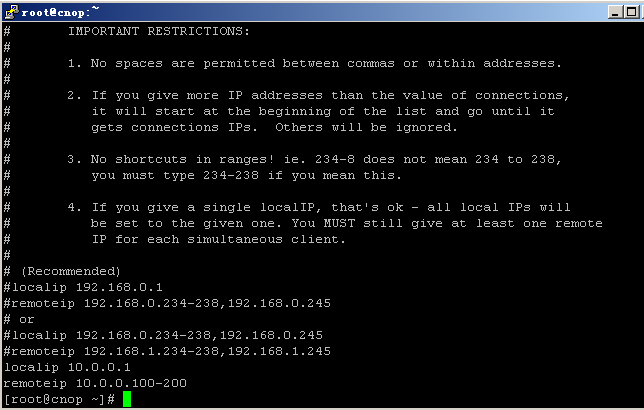
localip 10.0.0.1remoteip 10.0.0.100-200
The IP addresses above can be chosen freely. Any Class A, B, or C private network addresses will work, as long as you ensure they don’t conflict with IP configurations elsewhere. The remoteip range starts assigning IPs to clients from the first address (10.0.0.100), and localip designates the internal gateway address for the server.
3. Configure Client DNS
To configure the client DNS, first locate the options file specified in /etc/pptpd.conf. If none is specified, it defaults to /etc/ppp/pptpd-options.Add the following to the configuration file:
ms-dns 202.96.128.86ms-dns 202.96.128.166
Configure these to DNS servers appropriate for the client’s location.
4. Configure VPN Accounts
Next, create the VPN accounts. Accounts are stored in /etc/ppp/chap-secrets. Open this file for editing and add your username and password in the following format: username, protocol, password, IP address.
Next, create the VPN accounts. Accounts are stored in /etc/ppp/chap-secrets. Open this file for editing and add your username and password in the following format: username, protocol, password, IP address.
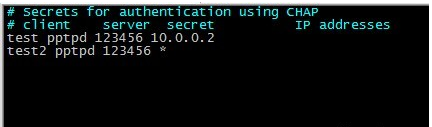
If the IP address is specified explicitly here, it assigns a static IP. An asterisk (*) means a dynamic assignment.
Start the service:Once configured, you can start the service and enable it to launch on boot.
service pptpd restart
chkconfig pptpd on
Check if the server is listening for PPTP connections on port 1723:

5. Configure System Forwarding
The VPN service can now be connected to, but it cannot forward traffic through the VPN server—meaning you cannot browse the internet or access other servers. You need to enable system forwarding and NAT. Edit the system configuration file /etc/sysctl.conf and set the following value to 1:
net.ipv4.ip_forward = 1
If IPv6 becomes widespread in the future, you would likely need to change the IPv6 setting instead. To make the change take effect immediately, use the command:
sysctl -p
6. Configure Firewall Forwarding
iptables -t nat -A POSTROUTING -o eth0 -j MASQUERADEoriptables -t nat -A POSTROUTING -s 10.0.0.0/24 -o eth0 -j SNAT –to 115.115.115.115
The first method is simpler and automatically masquerades the IP. In the second method, 10.0.0.0/24 refers to the virtual VPN private network, and 115.115.115.115 represents the external network address, which handles NAT. If the VPN server is used as a proxy for internet access, the configuration above alone may cause slow website loading. You need to manually adjust the MSS for forwarded packets:
iptables -A FORWARD -p tcp –syn -s 10.0.0.0/24 -j TCPMSS –set-mss 1356
This will prevent the problem of web pages failing to open. Finally, save your firewall rules.