原文地址:http://www.lifelinux.com/how-to-install-nginx-and-php-fpm-on-centos-6-via-yum/
开始安装Nginx和PHP-FPM之前,你必须卸载系统中以前安装的Apache和PHP。用root登录输入下面的命令:
# yum remove httpd* php*
默认情况下,CentOS的官方资源是没有php-fpm的, 但我们可以从Remi的RPM资源中获得,它依赖于EPEL资源。我们可以这样增加两个资源库:
# yum install yum-priorities -y# rpm -Uvh http://download.fedoraproject.org/pub/epel/6/i386/epel-release-6-7.noarch.rpm# rpm -Uvh http://rpms.famillecollet.com/enterprise/remi-release-6.rpm
Retrieving http://download.fedora.redhat.com/pub/epel/6/x86_64/epel-release-6-7.noarch.rpmwarning: /var/tmp/rpm-tmp.00kiDx: Header V3 RSA/SHA256 Signature, key ID 0608b895: NOKEYPreparing...########################################### [100%]1:epel-release ########################################### [100%]
输入下列命令
# yum install nginx输出样例
Dependencies Resolved================================================================================ Package Arch Version Repository Size================================================================================Installing: nginx x86_64 0.8.54-1.el6 epel 358 kInstalling for dependencies: GeoIP x86_64 1.4.8-1.el6 epel 620 k fontconfig x86_64 2.8.0-3.el6 base 186 k freetype x86_64 2.3.11-6.el6_1.8 updates 358 k gd x86_64 2.0.35-10.el6 base 142 k libX11 x86_64 1.3-2.el6 base 582 k libX11-common noarch 1.3-2.el6 base 188 k libXau x86_64 1.0.5-1.el6 base 22 k libXpm x86_64 3.5.8-2.el6 base 59 k libjpeg x86_64 6b-46.el6 base 134 k libpng x86_64 2:1.2.46-1.el6_1 base 180 k libxcb x86_64 1.5-1.el6 base 100 k libxslt x86_64 1.1.26-2.el6 base 450 k perl x86_64 4:5.10.1-119.el6_1.1 base 10 M perl-Module-Pluggable x86_64 1:3.90-119.el6_1.1 base 37 k perl-Pod-Escapes x86_64 1:1.04-119.el6_1.1 base 30 k perl-Pod-Simple x86_64 1:3.13-119.el6_1.1 base 209 k perl-libs x86_64 4:5.10.1-119.el6_1.1 base 575 k perl-version x86_64 3:0.77-119.el6_1.1 base 49 kTransaction Summary================================================================================Install 19 Package(s)Upgrade 0 Package(s)Total download size: 14 MInstalled size: 47 MIs this ok [y/N]: y
# chkconfig --level 345 nginx on
# /etc/init.d/nginx start
Starting nginx: [ OK ]
输入下列命令:
# yum --enablerepo=remi install php php-fpm
Dependencies Resolved==================================================================================== Package Arch Version Repository Size====================================================================================Installing: php x86_64 5.3.10-2.el6.remi remi 2.3 M php-fpm x86_64 5.3.10-2.el6.remi remi 1.1 MInstalling for dependencies: apr x86_64 1.3.9-3.el6_1.2 base 123 k apr-util x86_64 1.3.9-3.el6_0.1 base 87 k apr-util-ldap x86_64 1.3.9-3.el6_0.1 base 15 k httpd x86_64 2.2.15-15.el6.centos.1 updates 813 k httpd-tools x86_64 2.2.15-15.el6.centos.1 updates 70 k libedit x86_64 2.11-4.20080712cvs.1.el6 base 74 k mailcap noarch 2.1.31-2.el6 base 27 k php-cli x86_64 5.3.10-2.el6.remi remi 2.2 MTransaction Summary====================================================================================Install 10 Package(s)Upgrade 0 Package(s)Total download size: 6.8 MInstalled size: 21 MIs this ok [y/N]: y
# chkconfig --level 345 php-fpm on
# yum --enablerepo=remi install php-gd php-mysql php-mbstring php-xml php-mcrypt
# /etc/init.d/php-fpm restart
Starting php-fpm: [ OK ]
# vi /etc/nginx/nginx.conf
... location / { root /usr/share/nginx/html; index index.html index.htm index.php; } ... location ~ /.php$ { root html; fastcgi_pass 127.0.0.1:9000; fastcgi_index index.php; fastcgi_param SCRIPT_FILENAME $document_root$fastcgi_script_name; include fastcgi_params; } ...# /etc/init.d/nginx reload
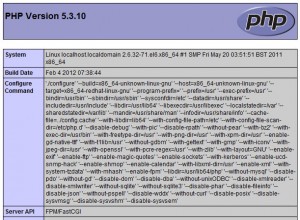
# vi /usr/share/nginx/html/info.php
<?phpphpinfo();?>
Nginx虚拟主机设置
设置例子
IP: 192.168.1.113
Domain: domain.local
Hosted at: /home/www/domain.local
输入下列命令新建名叫“www”的用户
# useradd www创建必要的目录
# mkdir -p /home/www/domain.local/public_html# mkdir -p /home/www/domain.local/log# chown -R www.www /home/www/# chmod 755 /home/www/
# cd /etc/nginx/conf.d/# cp virtual.conf www.conf
# vi /etc/nginx/conf.d/www.conf
server { server_name domain.local; root /home/www/domain.local/public_html; access_log /home/www/domain.local/log/domain.local-access.log; error_log /home/www/domain.local/log/domain.local-error.log; location / { index index.html index.htm index.php; } location ~ /.php$ { include /etc/nginx/fastcgi_params; fastcgi_pass 127.0.0.1:9000; fastcgi_index index.php; fastcgi_param SCRIPT_FILENAME $document_root$fastcgi_script_name; }}
# /etc/init.d/nginx configtest
the configuration file /etc/nginx/nginx.conf syntax is okconfiguration file /etc/nginx/nginx.conf test is successful
# vi /etc/php-fpm.d/www.conf找到“group of processes”,编辑成下面的样子:
; Unix user/group of processes; Note: The user is mandatory. If the group is not set, the default user's group; will be used.; RPM: apache Choosed to be able to access some dir as httpduser = www; RPM: Keep a group allowed to write in log dir.group = www
# /etc/init.d/nginx restart# /etc/init.d/php-fpm restart