

<<
A commonly used MySQL database recovery tool (which also handles backups) is phpMyAdmin. It’s an open-source, free tool provided by most hosting providers (such as Hawkhost) at no cost. Many webmasters have likely used phpMyAdmin for website database backup and recovery — it is indeed convenient and offers a multilingual interface. However, there is one scenario you may not have encountered yet: when your database backup file is relatively large, for example, an SQL dump file larger than 2MB, or even exceeding 10MB, attempting to restore it via phpMyAdmin will fail, displaying an error like the one shown below:

This happens because your SQL file is too large, exceeding phpMyAdmin’s processing capacity. This issue is especially pronounced under slow network conditions — for instance, if a webmaster tries to restore a large MySQL database backup using phpMyAdmin during peak congestion hours like 8 PM on a weekend, they are very likely to encounter this problem.
Clearly, phpMyAdmin is only suitable for restoring relatively small SQL backup files. For recovering oversized MySQL database backups, you need a dedicated restoration tool, and that tool is: BigDump!
Introduction to the BigDump Database Import Tool
BigDump is a script tool developed in PHP by Alexey Ozerov from Germany. It consists of a single file named bigdump.php (which you can rename for execution). This file runs independently, meaning it has nothing to do with your website’s core platform — whether you use WordPress, Drupal, or Joomla, as long as you use a MySQL database, you can use BigDump to restore oversized .sql backup files.
The working principle of BigDump is straightforward: staggered, segmented importing. When reading the SQL file, it only reads a small portion at a time, imports it, then restarts a recovery cycle, reads another small portion… and repeats this process over and over until the entire SQL file has been imported completely.
Demonstration of the BigDump Database Recovery Tool
Let’s assume we already have a MySQL database backup file named gate2.sql, roughly 150MB in size (don’t even think about restoring a file this large via phpMyAdmin). The database character encoding is UTF-8. We’ll demonstrate how to restore this backup file to an online database using the bigdump.php tool.
1. Obtain the BigDump File and Configure Settings
Download the BigDump tool and extract it to get the bigdump.php file. Without a doubt, the bigdump.php file requires some parameter configuration; otherwise, how would it know the connection credentials for the target database?
Open the bigdump.php file with a text editor. Starting around line 38, set the MySQL database connection parameters for the database you want to import into, as shown below:
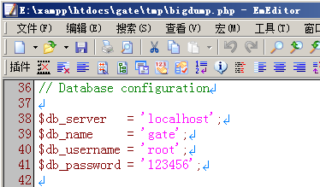
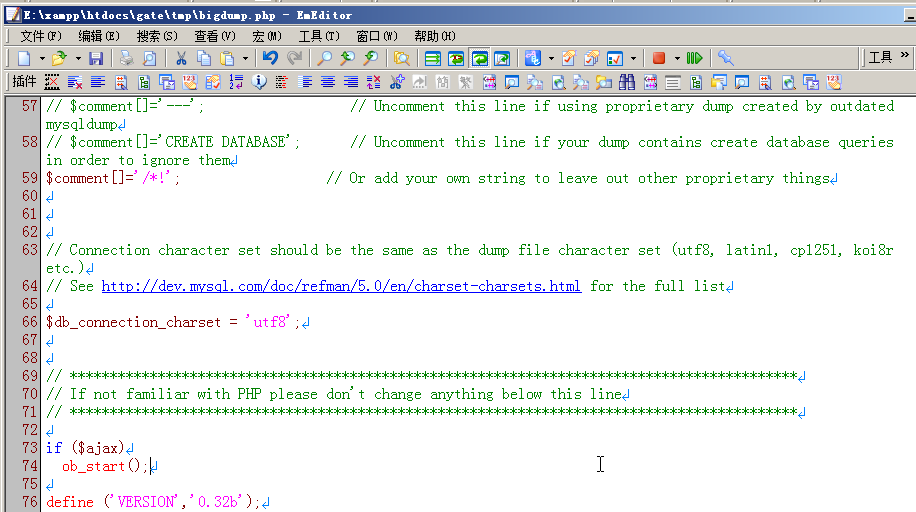
Generally, configuring these few items is sufficient. For certain special databases, you might also need to set the database character encoding around line 66. The bigdump.php file does not preset this parameter; the original line reads:
| $db_connection_charset = ''; |
If your database uses UTF-8 encoding, you must modify this line to:
| $db_connection_charset = 'utf8'; |
Note that the hyphen should be removed. See the illustration below:
Next, upload the configured bigdump.php file to your Joomla website. It is recommended to upload it to the /tmp temporary directory.
2. Upload the MySQL Database Backup File
Now, upload the database backup file to the same /tmp directory where bigdump.php resides. Considering the file size is quite large, we can upload it in zip format via FTP software like FileZilla, then remotely extract it using the eXtplorer file manager component installed in the Joomla backend, resulting in the gate2.sql file within the /tmp directory.
3. Launch the BigDump Tool
Enter the URL of bigdump.php in your browser’s address bar and hit Enter to run the file. For this demonstration, since it’s being performed on a local test server, the corresponding URL is:
http://localhost/gate/tmp/bigdump.php
If you entered the URL correctly, you should see a screen like this:
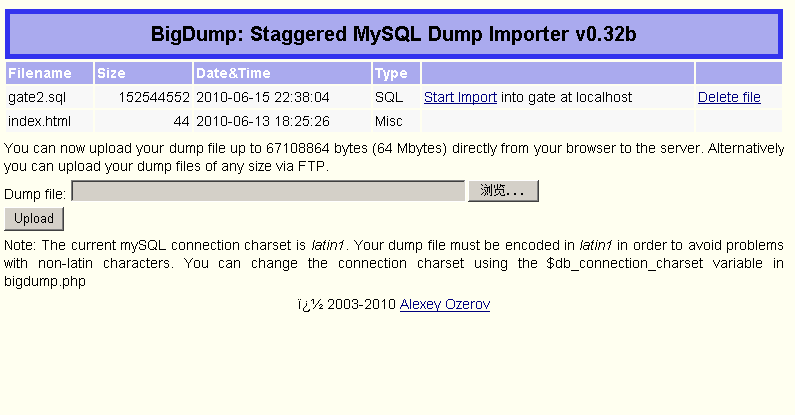
This indicates that the BigDump tool has started successfully. Upon launching, it automatically scans all files and subdirectories within its current directory. If it finds any SQL format or gzip/zip format files, it assumes these are database files and displays corresponding action links next to them. For instance, in the screenshot above, it detected a gate2.sql file in the directory, so two action links are shown in the same row on the right side of the table: “Start Import” and “Delete file”. The table in the screenshot also displays the SQL file size; you can see this backup file is close to 150MB.
In the screenshot above, you can also see a file upload feature. Clicking the “Browse” button allows you to upload an SQL file (or its archive) for importing. However, we do not recommend using this feature. For large files, FTP upload is the best option.
4. Run the BigDump Import Function
Click the “Start Import” link from the screenshot above, and you will see the following screen:
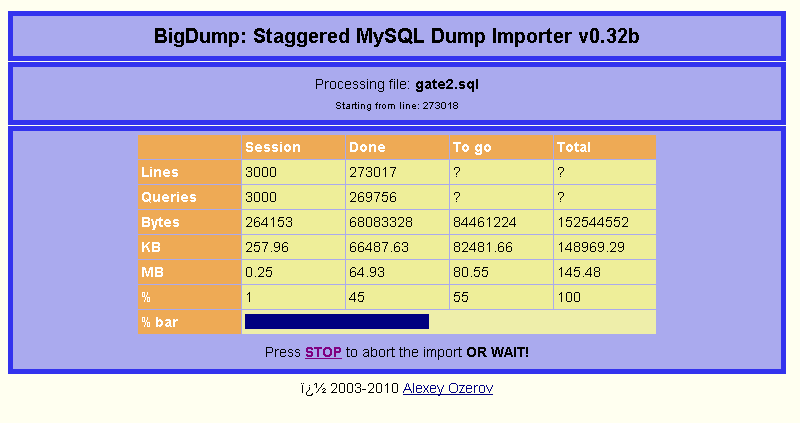
The screenshot above was captured some time after the import began. You can see that BigDump is importing the SQL file smoothly. The table not only shows the file size but also the number of bytes imported and the overall progress.
After some time (approximately 20 minutes), the import of this 150MB SQL file finally completes, and you will see this screen:
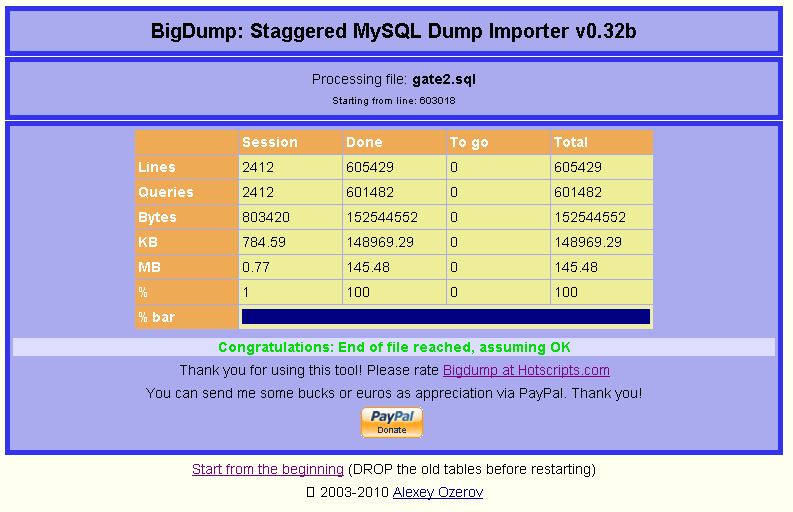
Where the progress bar was previously shown, a message now appears:
Congratulations: End of file reached, assuming OK
This means the end of the file has been reached, and presumably, the operation was successful. Upon seeing this message, you can be completely at ease. BigDump has successfully imported your SQL backup file into the MySQL database you specified.
Note: After the database recovery has finished successfully, do not forget to delete the bigdump.php tool and your SQL file! Important Considerations for Using the BigDump Database Import Tool
1. The target database must be emptied before starting the import.
If the target database contains any records, BigDump will be unable to import and will stop with an error. Therefore, please empty the target database (preferably delete all its contents) before running the bigdump.php file.
2. The SQL file used must not contain Extended Inserts.
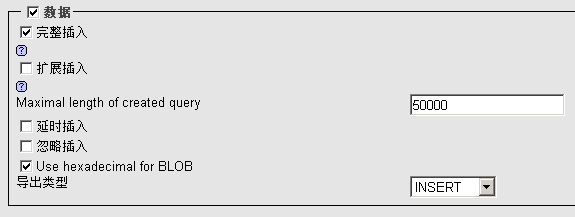
Many first-time BigDump users likely encounter this problem. This is because phpMyAdmin, when exporting a database, has the “Use extended inserts” option checked by default.
The “extended inserts” here refer to Extended Inserts, and BigDump cannot process SQL files containing Extended Inserts. So, when you create your database backup, you must uncheck the “Extended Inserts” option in the phpMyAdmin panel, as shown below:
3. How to make Akeeba Backup work with BigDump?
We previously recommended using Akeeba Backup to create backup archives. So, can you use Akeeba Backup to create a database backup and then import it via BigDump? Absolutely. However, this requires some special techniques, which we will cover in our detailed guide on using Akeeba Backup.
4. Timeout errors still occur when importing with BigDump.
This issue is more common on servers with lower configurations or during peak server load times. If this happens, you can try modifying the $linespersession parameter found under the “Other settings (optional)” section of the bigdump.php file, reducing its default value of 3000 to something smaller. (Though, I’d still suggest switching to a better server, like Hawkhost).
5. What to do if a MySQL server overrun occurs?
If the server performance is poor, a MySQL server overrun fault might occur during the bigdump.php process. You can address this by modifying the $delaypersession parameter in the bigdump.php file. This parameter tells the bigdump.php script to pause for a certain period after finishing importing one segment (the value you set is the pause duration, in milliseconds), before starting the next segment’s import. This prevents the server from becoming overloaded.
6. Feed the .sql format file directly to BigDump.
In this demonstration, we first uploaded the zip archive to the server, then extracted it into a .sql format file, and finally imported it via BigDump. Why not use BigDump directly to import the compressed backup file?
Indeed, BigDump has the ability to import compressed SQL backup files (zip/gzip). However, when processing a compressed file, it first needs to extract it in a temporary directory before reading it. Please note: this extraction is not a one-time event; every time it imports a small segment, it must re-extract the entire archive from scratch. Therefore, importing a compressed file directly actually slows down bigdump.php’s execution.
7. I have an even stranger problem…
Generally speaking, running bigdump.php to import an SQL backup file is very straightforward. If you follow the precautions and steps mentioned above and still cannot successfully import your database backup file, please visit the BigDump official website to read more FAQs and find the cause.
Tool download address: BigDump ver. 0.32b (beta) (10 KB ZIP archive)
Source: http://www.joomlagate.com/
<<<